Showing posts with label side dish. Show all posts

Sunday, July 5, 2015

Tomato & Sweet Onion Salad with Gorgonzola Vinaigrette

simple summer salad for a crowd...

This 4th of July weekend was full of family, friends, and of course food. We celebrated on both Friday and Saturday so I had plenty of opportunity to make something yummy, but I also wanted to relax. So, what's easier than a salad? This recipe came from one of my husband's family members - thanks Marcie! - and I told her I'd post it to my blog one day. Well, that day is here, and what a yummy salad this was.

For this blue series I'll be focusing on Gorgonzola cheese. It's similar to blue cheese, but in my opinion, a little more mild. So, if you aren't a big fan of blue cheese, you might try Gorgonzola. The cheese in the vinaigrette is precisely what makes this salad so delicious and different. This side salad serves a crowd, so make it for your next party. Here's how...

Ingredients - Serves 10-12
Vinaigrette
1/2 C White Wine Vinegar
3/4 C Extra Virgin Olive Oil
1/4 C Fresh Parsley, minced
1 tsp. Black Pepper
1 (5oz.) Container Crumbled Gorgonzola Cheese
Salad
2 Heads Romain Lettuce, torn
1 Large Vidalia (sweet) Onion, sliced
5-6 Tomatoes, sliced
2-3 Sprigs Fresh Parsley, torn
Kosher Salt & Black Pepper

Directions
Prepare the lettuce, onion, tomatoes, and parsley.

Make the vinaigrette: In a bowl combine the white wine vinegar, extra virgin olive oil, parsley, and black pepper. Whisk together. Add the Gorgonzola cheese, stir, and set aside.

Arrange the salad: On a large platter put down a bed of the torn Romain lettuce. Top with the sliced sweet onion and then the tomatoes. Finally, sprinkle on the parsley and a little salt and pepper. Serve with the Gorgonzola vinaigrette. Enjoy!

Saturday, June 6, 2015

Easy Grilled Stuffed Zucchini

very versatile vegetable...

With the start of summer comes some of my favorite squash - zucchini. So, for this series I'll focus on this green beauty. Zucchini is a very versatile vegetable. It can be served for breakfast, lunch, or dinner, as a side, in bread, and more. It pairs well with different cuisines such as Mexican, Italian, and Asian. And, it can be sauteed, baked, or grilled. For this side dish I've made stuffed zucchini, a classic dish, but I'm putting it on the grill for a fun twist.

I've stuffed the zucchini simply with corn, pico de gallo salsa, and fresh cilantro. I learned a new method to steam corn and this was the perfect dish to introduce it. I'm also taking a little help from the store in using pico de gallo salsa. It has tomatoes, onion, pepper, and usually cilantro in it. Summer cooking should be easy and this dish is just that. Try something new and make this side tonight. Here's how...

Ingredients - Serves 8
4 Medium Zucchini
Extra Virgin Olive Oil
Kosher Salt
Black Pepper
2 Ears Fresh Corn
1/2 C Pico De Gallo Salsa
5 oz. Queso Fresco, crumbled
3 Sprigs Fresh Cilantro (optional), roughly chopped

Directions
Preheat the grill to 350 degrees.

Prepare the zucchini: Halve each zucchini length-wise. Trim the ends, but don't cut all the way off. The zucchini should look like a canoe. Using a spoon, hollow out the middle, leaving most of the flesh in tact. Put the zucchini cut-side up into a grill-proof pan (suggest cast iron). Drizzle with some olive oil and sprinkle with salt and pepper. Rub to coat well. Grill cut-side down until marked and nearly cooked through. Put back into the pan, cut-side up. Set aside.

Make the stuffing: Put the corn into the microwave (do not shuck) and cook for 3 minutes on high. Carefully remove and cool to handle. Then, shuck the corn - the silts fall right off and you have perfectly steamed corn! Cut the kernels off the cob and put in a large bowl. Stir in the pico de gallo and queso fresco.

Stuff the zucchini & finish grilling: Spoon the stuffing evenly into the grilled zucchini. Put the entire pan back on the grill and cook covered for another 5-7 minutes, or until warmed through. Top with the chopped cilantro and serve immediately. Enjoy!

Thursday, April 23, 2015

Glenda Moore's Asian Coleslaw

spring salad season...


With spring comes lighter eating, preparing us for summer, sun, and fun. So, for this rainbow series I'll post 3 different salad type recipes. Each will pay homage to different ethnic cuisines and yield a fusion style recipe. Our first stop is Asia with an Asian Coleslaw from a family friend's kitchen.

This recipe was given to my mom by one of her friend's Glenda Moore. While I haven't followed her recipe to a "T", she still deserves the credit (I hope she doesn't mind I'm posting this for anyone to see) and praise. It's delicious and always a great alternative to traditional coleslaw. Plus it's super easy to make, can totally be made ahead, and transports easily. Get ready for summer sun and make this spring type salad. Here's how...

Ingredients - Serves 8-12
Dressing
1/2 C Peanut Oil
1 T Low Sodium Soy Sauce
1/4 C Red Wine Vinegar
3/4 C Granulated Sugar

Crunchy Stuff
4 T Unsalted Butter
1 C Sliced Almonds
1 Package Ramen Noodles (any flavor), crushed
1/4 C Sesame Seeds

Slaw
2 (10 oz.) Packages Broccoli (or regular) Slaw
6 Green Onions, sliced

Directions
This recipe can be made ahead. Just put the dressing, crunchy stuff, and slaw in separate containers. When ready to eat, mix together, and serve immediately.

Make the dressing: In a small bowl combine the oil, soy sauce, red wine vinegar, and sugar. Whisk to combine. Set aside. Note: You can substitute vegetable oil if you don't have peanut (or someone has an allergy).

Make the crunchy stuff: Melt the butter in a skillet. Add the almonds, crushed ramen, and sesame seeds. Toast until lightly browned. Set aside to cool. Note: It doesn't matter what flavor ramen you buy, the packet is discarded.

Make the slaw: Combine the broccoli slaw and onions in a large bowl. Add the dressing and crunchy stuff. Toss to mix well. Serve immediately. Enjoy!

Tuesday, April 7, 2015

Wedge Salad with Creamy Shallot Dressing & Crispy Shallot Topping

veggie wedge salad

A traditional wedge salad is served with lots of bacon. Obviously, for me this isn't an option. But, I love everything else about a wedge, so for this post I've made a vegetarian friendly version. The star of my salad is arguably the crispy fried shallots, but the dressing is quite good too. If you haven't guessed, I'm focusing on shallots for this series of recipes.

With spring comes lots of different types of onions - green, chives, ramps, etc. Shallots are one of many, but they are the only ones that are purple! Of course, they don't uncover their beautiful light purple color until the skin is peeled away. This recipe calls not only for shallots, but also for a little red onion and chives. All other traditional wedge ingredients like iceberg lettuce, tomatoes, and blue cheese are included. Make this veggie wedge salad even if you aren't a vegetarian, it's quite tasty. Here's how...

Ingredients - Serves 4
Wedge Salad
1 Head Iceberg Lettuce, core & cut into quarters
1 C Cherry Tomatoes, halved
1/4 Small Red Onion, thinly sliced
4 oz. Crumbled Blue Cheese

Creamy Shallot Dressing
1 Shallot, finely chopped
1/2 C Plain Greek Yogurt
1/4 C Sour Cream
1/2 C Butter Milk
1 T Chives, chopped
1 T White Wine Vinegar
Kosher Salt
Black Pepper

Crispy Shallot Topping
Canola Oil, for frying
4 Shallots
2 T All-Purpose Flour
Smoked Salt (or Kosher)

Directions
Begin by heating a large skillet (suggest cast iron) filled halfway with oil to 350 degrees.

Make the dressing: Combine the shallot, yogurt, sour cream, butter milk, chives, and vinegar in a medium bowl. Whisk together and season to taste with salt and pepper. Cover and refrigerate until ready to serve.

Make the crispy shallots: Slice the shallots into thin rings. Separate the rings and put them in a bowl with the flour. Gently toss to coat. Shake off any excess flour and put half of the shallots into the preheated oil. Fry the shallots until they are golden brown, about 5 minutes. Don't over cook, they will become bitter. Remove the crispy shallots to a paper towel lined plate and sprinkle with the smoked salt. Repeat until all of the shallots have been fried.

Build the salad: Put one iceberg wedge on a plate cut-side up. Top with some of the dressing. Then, add the tomatoes, red onion, and blue cheese. Finally top with the crispy shallots and more black pepper. Serve with extra dressing. Enjoy!

Sunday, March 8, 2015

Snap Pea & Asparagus Salad with Mustard-Dill Vinaigrette

spring forward to spring green...

We all lost an hour today, which sucks, but it really is good news because it means that spring is just that much closer (only 12 more days!). It has been warm and sunny this weekend - it's hard to believe we had snow last week. Most of the snow has melted and I'm really hoping we are done with it for this year. I guess we will see...

For this series I'm focusing on snap peas. Little more makes me think of spring than green, green peas that is! This recipe celebrates both snap peas and green peas along with asparagus, another veggie that makes me think of spring. These vegetables are blanched and then tossed in a Mustard-Dill Vinaigrette to create a simple side salad to welcome the up-coming spring season. Here's how to make it...

Ingredients - Serves 6
Salad
1 lb. Snap Peas
1 Bunch Asparagus
1 C Frozen (or fresh) Peas

Vinaigrette
1 T Dijon Mustard
1 T Fresh Lemon Juice
1 1/2 tsp. Sherry Vinegar
1 tsp. Capers, roughly chopped
1/2 tsp. Caper Brine
3 T Extra Virgin Olive Oil
2 T Fresh Dill, chopped
Kosher Salt & Black Pepper

Directions
Bring a large pot of water to a boil. Salt generously.

Trim the asparagus and then cut into 2 inch pieces. Drop the snap peas, asparagus, and frozen peas into the boiling water. Blanch for 2-3 minutes. Remove to an ice bath (bowl filled with ice and water) to shock the veggies and stop their cooking. After 5 minutes, drain and pat dry.

Meanwhile, make the dressing: In a large bowl combine the mustard, lemon juice, and vinegar; whisk. Next, add in the capers, brine, and a pinch each salt and pepper. Whisk in the extra virgin olive oil. Stir in the dill.

Add the dried peas and asparagus to the bowl with the dressing. Toss well. Refrigerate up to 2 hours before serving. Stir and serve. Enjoy!

Saturday, February 21, 2015

Easy Caesar Salad w/ Cornbread Croutons

waste not, what not...

It is a winter wonderland here in Cincy. We've been getting snow since Monday and it's only stopped briefly. I think we have about a foot as of today...it's just a bit much. But, it is February. Given the weather we've had, I haven't made it to the store this week. So, I was quite limited for this post to what I had in my refrigerator and/or pantry. So, I'm getting creative with this series. I'll be focusing on corn meal and the variety of things you can make with this versatile ingredient.

To start off I've made a simple Caesar salad. To put a twist on this classic salad I'm using leftover corn muffins I made earlier this week to create cornbread croutons. If you don't have leftover cornbread, just buy a pre-made loaf from the store. I like the Jiffy Cornbread mix personally and use it all the time. Other than the croutons, this salad is pretty standard. I'm finishing it with a dressing from Anne Burrell of Food Network fame and lots of cracked black pepper. If you are stuck inside like me and have these ingredients on hand, make this salad tonight. Here's how...

Ingredients - Serves 4
Salad
2 C Cubed Cornbread, 1 inch pieces
1 Romain Heart
1/2 C Shredded Parmesan Cheese
Cracked Black Pepper

Anne Burrell's Caesar Salad Dressing
1/2 C Grated Parmigiano Cheese
1 Lemon, zest & juice
1-2 Cloves Garlic
1 T Dijon Mustard
2-3 Anchovy Fillets (I used 1 T anchovy paste)
2 Shakes Worcestershire Sauce
1/3 C Olive Oil
Kosher Salt, as needed

Directions
Preheat the oven to 350 degrees.

Make the croutons: Put the cubed cornbread on a large baking sheet. Cook for 15-20 minutes, flipping halfway through. The croutons will be dry, crisp, and browned. Set aside to cool.

Make the dressing: In the bowl of a food processor, combine the parmigiana, lemon zest and juice, garlic, mustard, anchovies, and Worcestershire sauce. Puree until the mixture is smooth, 15-20 seconds. With the machine running, add the olive oil through the feed tube. Let the processor continue to run another 10-15 seconds. Taste and season with salt if needed.

Make the salad: Chop the lettuce and divide among 4 bowls. Top with the cornbread croutons, shredded Parmesan, Caesar dressing, and lots of cracked black pepper. Toss lightly and serve immediately. Note: To make this a dinner, split among two large bowls and add some cooked shrimp or chicken! Stay in, stay warm, but eat well. Enjoy!

Saturday, February 7, 2015

Winter Fruit Salad

heart healthy...

If there's ever a month to be good to your heart, February is it. With the American Heart Association brilliantly dubbing February "National Heart Month" and spreading the word about how to care for your heart, eating smart is a large part of it. Some of us will celebrate Valentine's Day by wearing red, others will go out to dinner, and some of us won't celebrate at all. So, I say, celebrate your heart all month, not just on February 14th. I'll be focusing on pomegranates for this series in all their ruby red glory.

This Winter Fruit Salad is a good place to start caring for your heart. Loaded with a variety of fruits and lightly dressed with lime juice, this is an excellent source of vitamins and antioxidants. And, it's super easy to make. Pomegranates are just going out of season (you can still find the seed however) so make this salad soon! Here's how...

Ingredients - Serves 6
1 Pomegranate (or 1 1/2 C seeds)
2 (10.5 oz.) Cans Mandarin Oranges in juice (not syrup)
1 Mango, diced
2 Firm Bananas, sliced
2 Kiwi Fruit, pealed & diced
1 Lime, zest & juice
1/2 T Granulated Sugar
Big Pinch Kosher Salt

Directions
Fill a large bowl with water. Extract the pomegranate seeds: Score (don't cut through) the skin of the pomegranate with one circular cut around the top and bottom. Then, score the skin by cutting down from the circular cut at the top to the bottom. Score the pomegranate 5 or 6 times from top to bottom.

Next, submerge the fruit in the large bowl of water. Gently pull the pomegranate apart to expose the seeds. Work carefully to remove the skin and membrane that hold the seeds in. The membrane will float to the top of the bowl and the seeds will sink to the bottom. Discard the skin and membrane. Then, scoop out the seeds and lay them on paper towels to dry.

Meanwhile, mix the other fruit together: Drain the mandarin oranges and add to a large bowl. Toss in the mango, bananas, and kiwi fruit. Add the pomegranate seeds, lime zest & juice, sugar, and salt. Stir everything together well.

Allow the salad to sit for about 10 minutes. Stir again to distribute the juices and serve. It's easy to be good to your heart. Enjoy!

Saturday, January 24, 2015

Oven "Fried" Potato Wedges w/ Balsamic Ketchup

it's good to be bad...

For this rainbow series, given my New Year's resolution to eat better, I'm lightening up some of my favorite comfort foods. It's important to still be able to enjoy some of what I consider comfort or "bad" foods like fries, pasta, and dessert. All in moderation. So, for this series, I'll be lightening up and highlighting the nutrients in each one of these dishes. First, I'm tackling the fry....

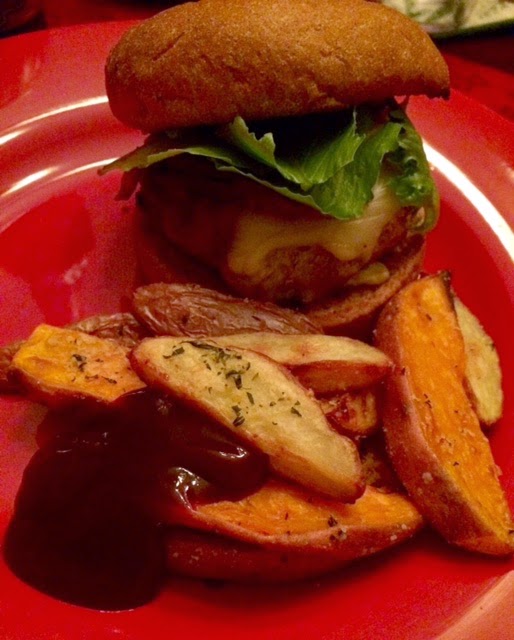
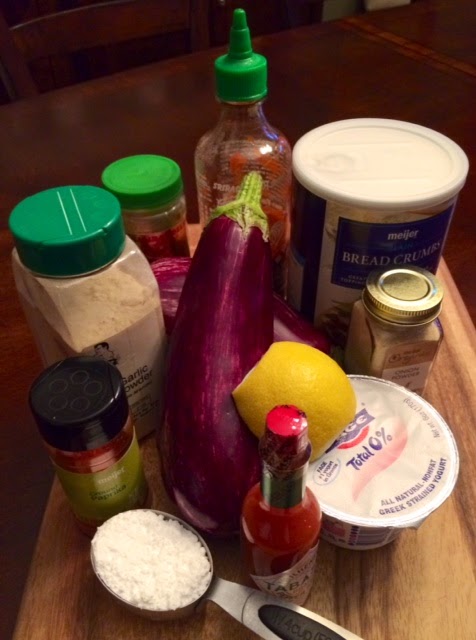
There is one easy way to bring down the calorie and fat count with fries and that's to bake them. And while I do this, I'm also taking my potato wedges a few steps further by making them good for you. First, I'm using 3 types of potatoes: red, yellow, and sweet. These varieties have many more benefits compared to the usual russet potato, such as iron, vitamins C/A/B5/B6, thiamin, and much more. Specifically, sweet potatoes contain carotenoids which help fight against disease and promote eye health. Secondly, I'm leaving the skins on the potatoes. That's where so many of the vitamins live and traditional fries strip us of those nutrients. Finally, I'm serving these potato wedges with a balsamic ketchup. Balsamic vinegar is high in antioxidants and it cuts down on the high sugar level found in most ketchups. I think I've given plenty of health reasons to make these fries, but I should also mention, they are tasty! So, make these with dinner tonight, here's how...

Ingredients - Serves 4
Potato Wedges
4-5 Small Red Skin Potatoes
4-5 Small Yellow Skin Potatoes
2 Small Sweet Potatoes
2-3 T Canola Oil
1 tsp. Kosher Salt
Cooking Spray
3 T Grated Parmesan Cheese
1 T Fresh Thyme, chopped

Balsamic Ketchup
1/4 C Ketchup
2-3 T Balsamic Vinegar
2-3 Dashes Worcestershire Sauce

Directions
Preheat the oven to 450 degrees. Line 2 baking sheets with parchment paper. Set aside.

Clean the potatoes by scrubbing and drying them well. Cut into wedges, making sure each is about the same size. Put them in a bowl, drizzle with the oil, and season with salt. Spray the prepared baking sheets with cooking spray. Evenly distribute the potatoes on the two trays. Be sure to give the wedges space so that they can cook on all sides (and don't steam). Bake for 15 minutes.

Meanwhile, mix the Parmesan cheese and thyme together in a small bowl. Once the potatoes have finished cooking on the first side, flip each fry, and sprinkle with the cheese mixture. Put back into the oven and finish cooking, about 10 more minutes.

As the fries finish cooking, make the balsamic ketchup. In a small bowl combine the ketchup, balsamic vinegar, and Worcestershire sauce. Taste and adjust flavors to your liking. Set aside.

Serve the fries immediately with the balsamic ketchup. We enjoyed ours with turkey burgers (yep, still working toward eating more poultry this year too). Sometimes, it can be good to be bad. Enjoy!

Sunday, December 7, 2014

Lemony Roasted Brussels Sprouts

leafy green...

This simple side dish is just what the holiday season ordered. I'd never had Brussels sprouts until I made them for myself a few years ago. I didn't know what to expect, but I love broccoli and cabbage, so I figured I'd like Brussels sprouts too. Like is an understatement, I love them! They are especially tasty when roasted.

If you've never had Brussels sprouts or it's been a while, make this recipe. It only takes about 30 minutes to make and 20 of those are letting the Brussels sprouts roast in the oven. So, when you need a quick and healthy vegetable to pair with dinner try out some roasted Brussels sprouts. Here's how...

Ingredients - Serves 4
1 Bunch Brussels Sprouts, cleaned & cut in half lengthwise
2 T Lemon Flavored Olive Oil
1 tsp. Kosher Salt
1/2 tsp. Ground Black Pepper
1/2 Lemon, zest & juice
1/4 C Grated Parmesan Cheese

Directions
Preheat the oven to 425 degrees.

Spread the Brussels sprouts out on a baking sheet. Drizzle with the olive oil and sprinkle with the salt and pepper. Toss to coat. Roast in the preheated oven for about 20 minutes, or until charred.

Put the roasted Brussels sprouts into a serving dish. Add the lemon zest, juice, and Parmesan cheese and toss well. Serve immediately. Enjoy!

Thursday, November 20, 2014

Sweet 'n Spicy Twice Baked Sweet Potatoes

sugar and spice, oh so nice...

I HATED, yes HATED, sweet potatoes when I was a kid. I used to sit at the dinner table forever when they were served. I eventually ate them by holding my nose and chugging milk as a chaser. Then I had sweet potato fries and realized that I do like sweet potatoes, I just don't like how they were served when I was a kid. I'd only had sweet potatoes with marshmallows, brown sugar, and butter. So, in essence, sweet potatoes were made sweeter.

This recipe is different, I've made sweet potatoes both sweet and spicy. This recipe is a riff on the popular twice baked potato, stuffed with cheese, green onion, jalapeno, and spices. It's a great side dish for fall and for the up-coming Thanksgiving holiday. Make this dish for either occasion, here's how...

Ingredients - Serves 4
4 Medium Sweet Potatoes, scrubbed clean
2 T Unsalted Butter, melted
1 C Shredded Sharp Cheddar Cheese, plus more for topping
3 Green Onions, chopped
1 Jalapeno, seeded & chopped
1 T Chili Powder
1 tsp. Paprika
1/2 tsp. Ground Cumin
1/4 tsp. Cayenne Pepper
1 tsp. Kosher Salt
1/2 tsp. Black Pepper

Directions
Preheat the oven to 400 degrees. Place the potatoes on a baking sheet and cook for 1 hour, or until the potatoes are cooked through. Remove from the oven to cool slightly, enough to handle. Reduce the oven temperature to 350 degrees.

Once the potatoes are cooled, cut off the tops to make a canoe-shape. Reserve the tops. NOTE: You are only cutting off the top, not cutting the potato in half. Carefully scoop out the flesh, leaving enough for the skin to keep its shape. Place the scooped out potato skins back on the baking sheet.

Put the potato flesh into a mixing bowl. Add the rest of the ingredients and mix everything together really well. Taste and adjust the seasoning as needed. Then, put the potato mixture evenly back into the skins, mounding as necessary.

Top each potato with a little more cheese. Place the tops, cut side up, onto the baking sheet as well. Season with a little salt, pepper, and chili powder. Place back into the oven and bake for another 15-20 minutes, or until heated through. Serve immediately. Enjoy!

Monday, October 6, 2014

Eggplant Fries w/ Super Hot Sauce

restaurant remake...

This recipe was inspired by a dish I had at Zula Restaurant & Wine Bar in downtown Cincy. My husband, our friend James, and I all went to Zula last year for restaurant week. It's one of the newer restaurants in town and worth going to for a special occasion. On the menu were eggplant fries. But not just plain breaded eggplant, we are talking dusted with powdered sugar and served with hot sauce. We were intrigued to say the least, and after trying them, we were totally sold.

My recipe remake is a little different than what we had, but still tastes much like the dish at Zula. For starters, my eggplant fries are baked. By cooking the fries this way, I'm cutting down on the calories, but I promise, none of the flavor is lost. Another way my recipe differs is that I use a yogurt mixture and bread crumbs to coat my eggplant. It provides a different texture than the fries at Zula. Finally, my super hot sauce is a mixture of three condiments - I'm sure they make theirs from scratch at Zula - but, both are blistering hot. Try this restaurant remake and then go to Zula and compare. Here's how to make it...

Ingredients - Serves 6
Fries
2 Medium Eggplants (suggest graffiti)
2/3 C Nonfat Greek Yogurt
1/2 tsp. Garlic Powder
1/2 tsp. Onion Powder
1 tsp. Paprika
1 tsp. Kosher Salt
1/2 tsp. Black Pepper
4 T Lemon Juice
2-3 C Plain Breadcrumbs
2 T Powdered Sugar

Hot Sauce
4 T Sriracha
1-2 T Sambal Oelek
1 tsp. Tabasco Sauce

Directions
Preheat the oven to 450 degrees. Prepare two large baking sheets by placing a cooling rack on each of them. Set aside.

Cut the eggplants into fries: Cut the top and bottom off each eggplant. Then stand upright and slice the eggplant down the middle. Cut each of the halves length-wise once more, creating 4 planks. Next cut each plank into 4-5 long strips. Finally, cut the strips in half to create a fry shape. Each fry should be about 1/4 inch in thickness.

Setup your breading station: In a bowl combine the yogurt, garlic powder, onion powder, paprika, salt, pepper, and lemon juice. Stir to combine all the ingredients well. Then pour the breadcrumbs onto a plate. Line up the cut eggplant, yogurt mixture, and bread crumbs next to each other. Place one of the prepared trays after the breadcrumbs.

Bread the eggplant: Dip a few eggplant pieces into the yogurt, shaking off the excess, then place them into the breadcrumbs. Sprinkle breadcrumbs all over the eggplant pieces, pressing lightly to help the breadcrumbs adhere. Shake off any excess and then place on the prepared tray. Repeat this process until all of your ingredients are used up.

Bake the fries: Put the trays into the preheated oven. Bake for about 14 minutes, rotating the trays halfway through the cook time. When the fries are cooked the eggplant will be tender and the breading will be crisp.

Make the super hot sauce: While the fries cook, combine the sriracha, sambal oelek, and Tabasco together in a small bowl. If you dare: taste to balance the mixture. The sriracha will add a bit of sweet heat, the sambal oelek a chili paste fermented style heat, and finally the Tabasco sauce will add fiery heat. Mix well and set aside.

Finish the fries: Put the powdered sugar into a fine-mesh sieve. Immediately after removing the fries from the oven, dust them with the powdered sugar. Remove the fries to a plate. Serve immediately with the super hot sauce. Enjoy this restaurant remake! Let me know what you think if you've had Zula's version and mine.