Showing posts with label Parmesan cheese. Show all posts

Saturday, June 13, 2015

Zucchini "Pasta" with Fresh Cherry Tomato Sauce

lighten up...

Naturally the summer brings with it fresh fruit and produce and with that also comes lighter meals. I tend, at least, to cook with more of these fresh ingredients and less with comfort type foods. However, there's one comfort I'm not willing to give up - even in summer - and that's pasta. So, for this post, I'm lightening up an easy pasta dinner by subbing in half of the pasta I would normally use for zucchini.

To make this meal possible you will need one bit of special equipment - a julienne peeler (or maybe your food processor). I ordered this tool on Amazon at the same time I ordered my Popsicle molds (remember I said I would feature another tool!) and have yet to use it. This was the perfect meal to try it out! Overall, it was pretty easy to use (once I got the hang of it), but beware, the blade is sharp and you won't be able to julienne the entire zucchini, just use as much as you can. Anyway, once the zucchini is prepared, the rest of the recipe is quite easy to make and sings summer. I serve this with crusty bread and have no guilt - hey, I cut out half my carbs already by subbing in zucchini! So, lighten up and make this summery pasta dish. Here's how...

Ingredients
2-3 Zucchini
1/2 Box Whole Wheat Spaghetti
2 T Olive Oil
2 Cloves Garlic, minced
1 Shallot, minced
2 Pints Cherry Tomatoes
1/3 C Dry White Wine
Kosher Salt & Black Pepper
1/2 C Fresh Basil, chopped
1 T Fresh Oregano, chopped
1/2 C Grated Parmesan Cheese, more for topping
To Serve: Crusty Bread

Directions
Bring a large pot of water to a boil.

Prepare the zucchini: Using a julienne peeler (suggest OXO), cut the zucchini into long strands (like pasta). Put the cut zucchini on a paper towel lined plate, season with 1 tsp. salt, toss, and allow to stand for 10-12 minutes. Then, squeeze dry (there will be lots of liquid) and set aside.

Meanwhile, make the sauce: In a large high-sided skillet, heat the oil over med-high. Add the garlic and shallots, cook for 1 minute. Then add the cherry tomatoes and cook for 5-6 minutes, or until they begin to soften. Next, add the wine and season with a little salt and pepper. Cover and cook until the tomatoes burst, about 15 minutes. Remove the lid and reduce down into a thick and paste-like sauce, about 5 more minutes.

Cook the "pasta": Generously season the boiling pot of water with salt and drop the whole wheat pasta. Cook until al dente, 8-10 minutes. Reserve 1 cup pasta cooking water and drain the pasta. Add the zucchini to the sauce and some of the pasta cooking water. Cook for 3-4 minutes or until the zucchini begins to soften. Add the drained whole wheat pasta and continue to cook for another 2-3 minutes, adding more pasta cooking water as needed. Add the basil, oregano, and cheese and toss to combine. Taste for seasoning and adjust as needed.

Plate the pasta: Serve the dish immediately sprinkled with more Parmesan cheese and crusty bread on the side for sopping up the sauce (and have no guilt!). Enjoy this light and summery pasta. Mangia!

Sunday, March 15, 2015

Chicken & Snap Pea Risotto (or Fancy Chicken & Rice)

classin' it up...

One of my husband's favorite foods is rice, more specifically, he loves risotto. So, I made this dish with him in mind. But, I also had to consider my featured ingredient - snap peas. Making a spring risotto with peas lead me to thinking about the classic dish chicken and rice. So, for this dish I made a "fancy" version and it's delicious!

Risotto is one of those things that intimidate people, but it really is easy to make. There are just three keys to being successful: 1) Know the correct ratio of liquid to rice, it is 3:1. 2) Heat the liquid, this is important as it keeps the rice cooking at a high temp, helping the rice absorb it. 3) Finally, allow the rice to absorb all of the liquid before adding more, this helps the rice release it's starches and you achieve the creamy texture of a well made risotto. So, be fearless, make this fancy chicken and rice. Here's how...

Ingredients - Serves 4-6
1 Box (32 oz.) Chicken Stock
2 T Unsalted Butter
1 Small Yellow Onion, diced
2 Carrots, pealed & diced
1 Clove Garlic, minced
8 oz. Sugar Snap Peas
Extra Virgin Olive Oil
1 1/2 C Arborio Rice
1/2 C White Wine
1/2 C Grated Parmesan Cheese
1 Rotisserie Chicken, white meat shredded
Kosher Salt & Black Pepper

Directions
Put the chicken stock plus 1 C water into a sauce pan. Heat over medium until warm, but not boiling. Keep warm.

As the liquid heats, cook the veggies. Heat a large, high-sided skillet over med-high. Add the butter, onion, carrots, garlic, and snap peas. Sauté until the onions and carrots soften, about 5 minutes. Remove the veggies to a plate.

Add 1-2 T extra virgin olive oil to the skillet and return to med-high heat. Add the rice to toast for a few minutes. Then deglaze with the wine. Continue to cook 1-2 minutes, or until the wine is completely absorbed.

Next, little by little, add the warm stock to the rice, stirring after each addition until it's completely absorbed. Repeat this process until all of the stock has been used up and the rice is creamy, about 20 minutes.

Stir in the cheese, veggies, and chicken. Add salt and pepper to taste. Then, plate the risotto and sprinkle with a little more Parmesan cheese. Serve immediately and enjoy!

Saturday, February 21, 2015

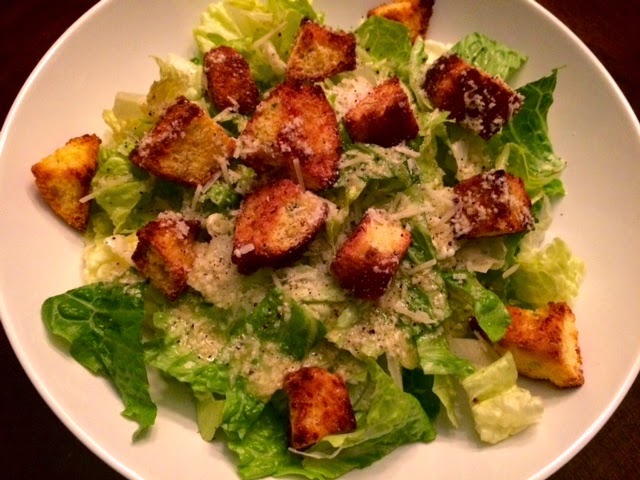
Easy Caesar Salad w/ Cornbread Croutons

waste not, what not...

It is a winter wonderland here in Cincy. We've been getting snow since Monday and it's only stopped briefly. I think we have about a foot as of today...it's just a bit much. But, it is February. Given the weather we've had, I haven't made it to the store this week. So, I was quite limited for this post to what I had in my refrigerator and/or pantry. So, I'm getting creative with this series. I'll be focusing on corn meal and the variety of things you can make with this versatile ingredient.

To start off I've made a simple Caesar salad. To put a twist on this classic salad I'm using leftover corn muffins I made earlier this week to create cornbread croutons. If you don't have leftover cornbread, just buy a pre-made loaf from the store. I like the Jiffy Cornbread mix personally and use it all the time. Other than the croutons, this salad is pretty standard. I'm finishing it with a dressing from Anne Burrell of Food Network fame and lots of cracked black pepper. If you are stuck inside like me and have these ingredients on hand, make this salad tonight. Here's how...

Ingredients - Serves 4
Salad
2 C Cubed Cornbread, 1 inch pieces
1 Romain Heart
1/2 C Shredded Parmesan Cheese
Cracked Black Pepper

Anne Burrell's Caesar Salad Dressing
1/2 C Grated Parmigiano Cheese
1 Lemon, zest & juice
1-2 Cloves Garlic
1 T Dijon Mustard
2-3 Anchovy Fillets (I used 1 T anchovy paste)
2 Shakes Worcestershire Sauce
1/3 C Olive Oil
Kosher Salt, as needed

Directions
Preheat the oven to 350 degrees.

Make the croutons: Put the cubed cornbread on a large baking sheet. Cook for 15-20 minutes, flipping halfway through. The croutons will be dry, crisp, and browned. Set aside to cool.

Make the dressing: In the bowl of a food processor, combine the parmigiana, lemon zest and juice, garlic, mustard, anchovies, and Worcestershire sauce. Puree until the mixture is smooth, 15-20 seconds. With the machine running, add the olive oil through the feed tube. Let the processor continue to run another 10-15 seconds. Taste and season with salt if needed.

Make the salad: Chop the lettuce and divide among 4 bowls. Top with the cornbread croutons, shredded Parmesan, Caesar dressing, and lots of cracked black pepper. Toss lightly and serve immediately. Note: To make this a dinner, split among two large bowls and add some cooked shrimp or chicken! Stay in, stay warm, but eat well. Enjoy!

Wednesday, January 28, 2015

Spaghetti Squash "Pasta" Puttanesca

crave healthy comfort food...

One of my favorite comfort foods is pasta. Macaroni and cheese, baked ziti, lasagna, really anything with a noodle, I'm in! Unfortunately, pasta is super high in carbs. So, it's important to enjoy in moderation. That's pretty difficult considering my husband is Italian and nearly every meal he wants to make includes pasta. So, for this post, I'm trying something totally new - spaghetti squash.

Yep, I've never made or even had spaghetti squash before tonight. But, in the spirit of eating healthier in this new year, I thought it was time to try it out. I was quite skeptical, but have to say, pleasantly surprised. The squash, while not the same as pasta, is a pretty good substitute. I'm serving this spaghetti squash with a puttanesca sauce. To make this sauce better for you, I'm adding tuna and arugula. Both of these are not traditional ingredients in puttanesca sauce. All in all, this meal is well rounded and satisfied my comfort food craving. Next time you have one, try out this recipe. Here's how to make it...

Ingredients - Serves 4
1 Spaghetti Squash
Extra Virgin Olive Oil
3-4 Cloves Garlic, thinly sliced
1/3 C Flat-Leaf Parsley, roughly chopped
1/4 C Pitted Kalamata Olives, roughly chopped
3 T Capers
1 (5 oz.) Can Tuna (in water), drained
1 T Anchovy Paste
1 tsp. Dried Oregano
1/2 tsp. Crushed Red Pepper Flakes
1 (14 oz.) Can "No Salt Added" Diced Tomatoes
1 C Arugula
To Serve: Grated Parmesan Cheese

Directions
Preheat the oven to 375 degrees.

Following the instructions on Eat Within Your Means, roast the spaghetti squash. Allow to cool for about 10 minutes, then squeeze the skin from the flesh and separate the strands into long "noodles". The manor in which the squash is cooked on the blog, worked really well. My "noodles" were nice and long!

While the squash is cooling, make the sauce. Heat 1-2 T extra virgin olive oil in a large skillet over med-high heat. Add the garlic, parsley, olives, capers, tuna, anchovy paste, oregano, and crushed red pepper. Sauté for 2-3 minutes. Then, add the tomatoes and simmer for about 5 minutes.

Next, wilt in the arugula and add the cooked spaghetti squash. Carefully toss together to combine, adding extra olive oil if needed. Adjust seasoning as needed (I didn't need to add any salt or pepper).

Finally, serve the "pasta" puttanesca topped with grated Parmesan cheese. Enjoy with a small side salad and bread. Here's to healthy comfort food!

Saturday, January 24, 2015

Oven "Fried" Potato Wedges w/ Balsamic Ketchup

it's good to be bad...

For this rainbow series, given my New Year's resolution to eat better, I'm lightening up some of my favorite comfort foods. It's important to still be able to enjoy some of what I consider comfort or "bad" foods like fries, pasta, and dessert. All in moderation. So, for this series, I'll be lightening up and highlighting the nutrients in each one of these dishes. First, I'm tackling the fry....

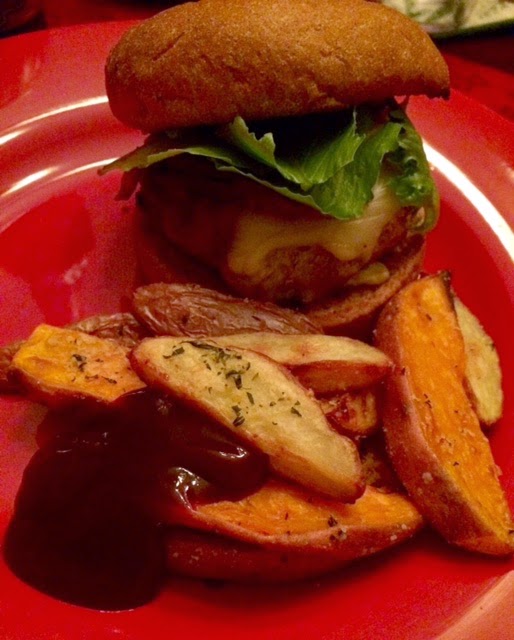
There is one easy way to bring down the calorie and fat count with fries and that's to bake them. And while I do this, I'm also taking my potato wedges a few steps further by making them good for you. First, I'm using 3 types of potatoes: red, yellow, and sweet. These varieties have many more benefits compared to the usual russet potato, such as iron, vitamins C/A/B5/B6, thiamin, and much more. Specifically, sweet potatoes contain carotenoids which help fight against disease and promote eye health. Secondly, I'm leaving the skins on the potatoes. That's where so many of the vitamins live and traditional fries strip us of those nutrients. Finally, I'm serving these potato wedges with a balsamic ketchup. Balsamic vinegar is high in antioxidants and it cuts down on the high sugar level found in most ketchups. I think I've given plenty of health reasons to make these fries, but I should also mention, they are tasty! So, make these with dinner tonight, here's how...

Ingredients - Serves 4
Potato Wedges
4-5 Small Red Skin Potatoes
4-5 Small Yellow Skin Potatoes
2 Small Sweet Potatoes
2-3 T Canola Oil
1 tsp. Kosher Salt
Cooking Spray
3 T Grated Parmesan Cheese
1 T Fresh Thyme, chopped

Balsamic Ketchup
1/4 C Ketchup
2-3 T Balsamic Vinegar
2-3 Dashes Worcestershire Sauce

Directions
Preheat the oven to 450 degrees. Line 2 baking sheets with parchment paper. Set aside.

Clean the potatoes by scrubbing and drying them well. Cut into wedges, making sure each is about the same size. Put them in a bowl, drizzle with the oil, and season with salt. Spray the prepared baking sheets with cooking spray. Evenly distribute the potatoes on the two trays. Be sure to give the wedges space so that they can cook on all sides (and don't steam). Bake for 15 minutes.

Meanwhile, mix the Parmesan cheese and thyme together in a small bowl. Once the potatoes have finished cooking on the first side, flip each fry, and sprinkle with the cheese mixture. Put back into the oven and finish cooking, about 10 more minutes.

As the fries finish cooking, make the balsamic ketchup. In a small bowl combine the ketchup, balsamic vinegar, and Worcestershire sauce. Taste and adjust flavors to your liking. Set aside.

Serve the fries immediately with the balsamic ketchup. We enjoyed ours with turkey burgers (yep, still working toward eating more poultry this year too). Sometimes, it can be good to be bad. Enjoy!

Friday, December 12, 2014

Caramelized Onion & Brussels Sprout Flatbread

perfect pizza for the holidays...

There are some amazing pizzerias around the Cincinnati area these days. Some of my favorites are A Tavola, Mellow Mushroom, and M. You really should try A Tavola if you haven't - they have some wacky, but tasty, combinations. Two of these restaurants make artisan pizzas with Brussels sprouts. So, I thought I'd make my own for this post. While they have handmade dough, wood-fired ovens, and/or culinary genius, and it would seem I'm at a disadvantage, I have to admit that my version isn't too bad! Just ask my husband or our friend James...

I consider this pizza a flatbread because it's served on a thin crust dough. However, you are free to use your favorite dough, it will be just as tasty. Instead of a regular pizza sauce, I use a ricotta and olive oil spread. This pairs well with the caramelized onion and Brussels sprouts. Finally, I top off this flatbread with Parmesan cheese for salt, dried cranberries for sweet, and balsamic vinegar for sour - hitting many of our senses. This pizza is quite appropriate for the Christmas holiday with all it's red and green. Make it for one of your next get togethers. Here's how...

Ingredients
1 Red Onion, halved & thinly sliced
1 Bag Brussels Sprouts, cleaned & sliced to 1/4 inch thick pieces
1 C Ricotta Cheese (light okay)
3-4 T Extra Virgin Olive Oil
Kosher Salt
Ground Black Pepper
1 Thin Crust Pizza Dough (suggest Pillsbury)
3 T Shaved Parmesan Cheese
3 T Dried Cranberries
2 T Balsamic Vinegar

Directions
Preheat the oven according to pizza dough package directions.

Heat a large skillet over med-high. Add 1 T olive oil and the thinly sliced red onion. Cook, stirring occasionally, until the onions are soft and caramelized, about 20 minutes. Be sure to monitor the heat on the pan and if needed, reduce to medium to prevent the onions from burning.

Once the onions are caramelized, add in the sliced Brussels sprouts and season with salt and pepper. Cook, stirring occasionally, for about 5 minutes or until the Brussels sprouts begin to brown.

Meanwhile, in a medium bowl combine the ricotta, 2-3 T olive oil, salt, and pepper. Stir to mix well. Roll out the pizza dough onto a large baking sheet. Spread on the cheese mixture, leaving a 1/2 inch border for a crust.

Next, remove the caramelized onions and Brussels sprouts from the heat. Evenly distribute the mixture on top of the dough and cheese. Place in the preheated oven and bake to package directions. Once the pizza is cooked, remove, and top with the Parmesan cheese and dried cranberries. Finish by drizzling with the balsamic vinegar. Slice and serve immediately. Enjoy!

Sunday, December 7, 2014

Lemony Roasted Brussels Sprouts

leafy green...

This simple side dish is just what the holiday season ordered. I'd never had Brussels sprouts until I made them for myself a few years ago. I didn't know what to expect, but I love broccoli and cabbage, so I figured I'd like Brussels sprouts too. Like is an understatement, I love them! They are especially tasty when roasted.

If you've never had Brussels sprouts or it's been a while, make this recipe. It only takes about 30 minutes to make and 20 of those are letting the Brussels sprouts roast in the oven. So, when you need a quick and healthy vegetable to pair with dinner try out some roasted Brussels sprouts. Here's how...

Ingredients - Serves 4
1 Bunch Brussels Sprouts, cleaned & cut in half lengthwise
2 T Lemon Flavored Olive Oil
1 tsp. Kosher Salt
1/2 tsp. Ground Black Pepper
1/2 Lemon, zest & juice
1/4 C Grated Parmesan Cheese

Directions
Preheat the oven to 425 degrees.

Spread the Brussels sprouts out on a baking sheet. Drizzle with the olive oil and sprinkle with the salt and pepper. Toss to coat. Roast in the preheated oven for about 20 minutes, or until charred.

Put the roasted Brussels sprouts into a serving dish. Add the lemon zest, juice, and Parmesan cheese and toss well. Serve immediately. Enjoy!

Sunday, November 9, 2014

Roasted Red Pepper Soup w/ Cheesy Pita Points

soup weather...

Some people say fall is sweater weather, but being a food person I equate the season differently. So, I'm going to say it's soup weather. As the weather turns colder, soup becomes the go-to for so many lunches and dinners at my house. It's tough though because sometimes I get in a rut and make the same kinds - chicken noodle, vegetable, or tomato. Well, this roasted red pepper soup offers a nice alternative to the norm.

This simple soup makes for a healthy, yet filling meal. It stars roasted red peppers, but is also full of other veggies and aromatics. I pair it with a different type of dunker - cheesy pita points. The recipe follows and I highly recommend making them to accompany this soup. This fall make a different kind of soup to warm up. Here's how...

Ingredients
4 Red Bell Peppers
3 T Olive Oil
1 Large Yellow Onion, chopped
2 Ribs Celery, chopped
2 Carrots, peeled & chopped
2 Cloves Garlic, minced
1 Bay Leaf
1 (32 oz) Box Low-Sodium Vegetable Stock
1 (15 oz) Can Tomato Sauce
To Serve: Fresh Flat-Leaf Parsley (chopped), Sour Cream, & Cheesy Pita Points (recipe follows)

Directions
Preheat the broiler to high and move the oven rack to two spots from the top. Line a baking sheet with foil.

Begin by roasting the red bell peppers: Cut the tops off the peppers. Cut them in half and remove the seeds and ribs. Press flat, cut side down, onto the prepared baking sheet. Broil for 10-12 minutes, or until the skin is charred. Carefully remove the peppers to a bowl, cover with plastic wrap, and allow to steam for 10 minutes. Peel off the charred skin, discard. Chop the peeled peppers and set aside.

Cook the veggies: Heat a heavy-bottom pot or dutch oven over med-high. Add the oil, onion, celery, carrots, garlic, and bay leaf. Saute for 6-8 minutes, or until the veggies begin to soften. Season with salt and pepper.

Make the soup: Add the broth, tomato sauce, and roasted red peppers to the pot. Continue to cook over medium for 15-20 minutes. Allowing the veggies to fully soften and the flavors to meld.

Puree the soup: Remove the bay leaf. Using an immersion blender, puree the soup in the pot until smooth. Or, use a blender to puree the soup. In batches, add the soup to the blender and puree. Note: Use caution when blending hot liquids in a blender, allow steam to escape. Season with salt and pepper to taste.

Serve the soup: Ladle the soup into bowls and garnish as desired. I suggest adding a dollop of sour cream, a sprinkling of parsley, & cheesy pita points (recipe follows). Enjoy!


Cheesy Pita Points
Ingredients
2 Pitas, cut in half
1 C Shredded White Cheddar Cheese
1 C Crumbled Feta Cheese
Olive Oil Cooking Spray
2 T Parmesan Cheese

Directions
Preheat the broiler to low. Open the pita pockets and divide the cheddar and feta cheese between them. Place on a baking sheet lined with parchment paper or a silpat mat. Spray each pita with cooking spray and sprinkle the tops with the Parmesan cheese. Broil until the cheese melts and the pitas become brown and crisp. Allow to cool 1-2 minutes. Then cut each pita into points and serve with the soup.

Monday, October 13, 2014

Eggplant Rollatini w/ Easy Arrabiata Sauce

cozy on up...

We are entering the days of comfort - over-sized sweaters, woolly socks, piles of blankets, and especially food. Baked pasta dishes, pot pie, stew, and more are just around the corner. This dish is completely comforting as well, but it's also a fake out. This dish is actually quite good for you because it's base is eggplant. If you don't love eggplant, this is a good dish for you to try out.

This is a great week night meal. It's quick and easy to make. Roasted eggplant slices are stuffed with a ricotta cheese mixture and baked in a spicy marinara sauce. Of course, comfort food isn't complete without ooey-gooey cheesy goodness. So, this dish is topped with both mozzarella and Parmesan. Cozy on up and make this dish. Here's how...

Ingredients - Serves 4
Rollatini
2 Medium Eggplants
Cooking Spray
Kosher Salt
Black Pepper
1 (15 oz.) Container Ricotta Cheese
1 Egg, beaten
1/4 C Slivered Almonds, toasted
1/4 C Parsley, chopped, more for topping
1/2 C Shredded Mozzarella Cheese
1/4 C Grated Parmesan Cheese

Arrabiata Sauce
Olive Oil
2-3 Cloves Garlic, minced
1/2 tsp. Red Pepper Flakes
2 Bay Leaves
16 oz. Plain Jarred Marinara Sauce


Directions
Preheat the oven to 375 degrees. Prepare two large baking sheets by putting a cooling rack on each. Set aside.

Cut the top and bottom off of each eggplant. Stand an eggplant up on its end and cut 1/2 inch thick planks out of each. Lay the planks on the prepared baking sheets. Spray with the cooking spray and sprinkle each slice with a little salt and pepper. Put the trays into the preheated oven and bake for 10 minutes, switching the trays halfway through.

As the eggplant roasts, make the easy arrabiata sauce. In a sauce pan over med-high heat add 1 T olive oil, garlic, and red pepper flakes. Saute for 30 seconds then carefully pour in the jarred marinara, add the bay leaves, and reduce the heat to low. Continue to simmer until the eggplant is done. Remove the eggplant to cool slightly.

As the eggplant cools, make the ricotta filling. In a medium bowl mix the ricotta, egg, almonds, parsley, and a little salt and pepper. Mix well to combine. Set aside.

Put 1/2 C of the sauce in the bottom of a 2 1/2 quart baking dish. Lay a piece of eggplant flat, put a couple of tablespoons of the ricotta mixture on one end of the eggplant, then roll up. Place in the baking dish seam-side down. Continue rolling the eggplant until all of the ingredients are gone or the baking dish is filled. Be sure to pack the dish tightly with the eggplant.

Next, pour the sauce over the top. Sprinkle with the mozzarella and Parmesan cheeses. Bake for 15-20 minutes or until the cheese is melted and bubbly. Allow the dish to cool for 10 minutes before serving. Each serving is three rollatini. Enjoy comfort without all the guilt!