Showing posts with label green onions. Show all posts

Friday, May 22, 2015

Curry Chickpea Tikka w/ Cool Cucumber Dipping Sauce

golden as the setting sun...

For this next series of posts I'm focusing on curry powder. There are many varieties of curry powder, but ironically, they don't exist in or come from India. Instead, curry powder is thought to have been invented by the English to help recreate dishes had while in India. Thus, we have many varieties of what we call "curry powder" here in America.

So, I've created my own version of curry powder and will then incorporate it into each recipe for this series. Traditionally whole spices would be used. They would be toasted in a dry skillet and then ground with a spice grinder. I'm taking a few short cuts and using all ground spices. I hope that makes it more feasible for you to make this at home. Once the golden curry powder has been made, it can be stored for months in a cool dry place (with other spices). First, let's make the curry powder...

Ingredients - Makes ~1/2 C
2 T Ground Cumin
2 T Ground Cardamom
2 T Ground Coriander
1/4 C Ground Turmeric
1/2 T Ground Cloves
1 tsp. Ground Red Pepper (Cayenne)
1 tsp. Ground Black Pepper

Directions
In a small bowl combine all of the spices. Whisk together. Store in an airtight container for up to 6 months.

Next, lets make the appetizer...

I've created this appetizer by fusing my Indian curry powder with a Middle Eastern favorite - falafel. These delicate "tikka" or chickpea balls are made in a food processor, rolled in panko, and originally were to be fried. However, I found that the tikka were too delicate to be fried. So, to avoid disaster, I put them into a well oiled mini muffin tin to bake. This recipe is quite delicious, but it was definitely trial and error on my part. I've therefore adjusted this recipe and I believe it will work just fine for you! Let me know if it doesn't. Here's how to make it...

Ingredients - Makes ~20
Curry Chickpea Tikka
2 Cans Low-Sodium Chickpeas, rinsed & drained
2 Cloves Garlic, roughly chopped
1 Inch Ginger, peeled & roughly chopped
2-3 Green Onions, roughly chopped
1/2 C Cilantro
1/2 Lemon, juiced
1 T Curry Powder (recipe above)
1 T Extra Virgin Olive Oil
1-1 1/2 C Panko Bread Crumbs
Cooking Spray

Cool Cucumber Dipping Sauce
1 C Low-Fat Greek Yogurt
1/2 Cucumber, shredded & squeezed dry
1/2 Lemon, juiced
Kosher Salt
Black Pepper

Directions
Make the curry powder following the directions above. Preheat the oven to 400 degrees.

Combine the chickpeas, garlic, ginger, green onions, cilantro, lemon juice, and curry powder in a food processor. Pulse 10-15 times to finely chop everything. Then, with the motor running, drizzle in the olive oil and continue to process until a thick paste forms. Don't add too much oil. This will cause the paste to become too soft and you won't be able to make the balls.

Next, make the tikka by rolling ~2 T chickpea mixture into a ball. Roll the ball in the panko, pressing a bit to help it adhere. Continue making the tikka until all of the chickpea mixture has been used up. Then, liberally spray a mini muffin pan with cooking spray. Put the tikka into the mini muffin cups and then liberally spray each with the cooking spray. Bake in the preheated oven for 25-30 minutes. Cool and serve.

While the tikka cook, make the dip. Combine the yogurt, shredded cucumber, lemon juice, and a pinch each salt and pepper in a bowl. Stir to combine. Taste and adjust seasoning as desired. Cover and refrigerate until ready to serve.

Place the room temperature Curry Chickpea Tikka on a platter and serve with the Cool Cucumber Dipping Sauce. Enjoy!

Monday, May 11, 2015

Arranged Seafood Salad with Grapefruit Vinaigrette

Happy Mother's Day...

Today we celebrate Mom. She does (and still does) so much for us. She's there when you need someone to talk to, supports you, and helps you no matter what. She may have given me life, but without her unconditional love I would never have known how to live. My mom is my best friend and I love her dearly. If I had been making her lunch today, I would have made this salad (she came over for dinner instead).

This arranged seafood salad takes a bit of time to make since everything needs to be chopped, but it's worth the effort, especially if it's for Mom. The shrimp and scallops are gently poached and then mixed with crab, avocado, green onions, dill, mayo, and sour cream. This seafood salad is creamy and fresh. I then arrange this on top of lettuce and surround it by grapefruit, jicama, radishes, and radicchio. Finally, I top the salad off with an easy grapefruit vinaigrette. Spoil Mom with this seafood salad. Here's how to make it...

Ingredients - Serves 4
Salad
1/2 lb. Bay Scallops
1/2 lb. Medium Size Shrimp, peeled & deveined (tails off)
1 (8 oz.) Container Crab Meat, picked over for shells
2 Avocados, pitted & diced
3 Green Onions, sliced
2 T Fresh Dill, chopped
2 T Mayo
2 T Sour Cream
1 Head "Living" (or Boston) Lettuce
1 Grapefruit, supreme
1/2 Jicama, cut into match-sticks
6 Radishes, thinly sliced
1/2 Head Radicchio, chopped

Vinaigrette
1/2 Grapefruit, zest & juice
~1/4 C Extra Virgin Olive Oil
1/2 tsp. Granulated Sugar
Salt & Pepper

Directions
Cook the scallops & shrimp: Bring a pot of water to a gentle boil. Add the scallops and shrimp and poach for 3 minutes. Drain and run under cold water. Pat dry.

Make the seafood salad: Combine the cooked scallops and shrimp to the crab, avocado, green onion, dill, mayo, and sour cream in a large bowl. Season with salt to taste, cover, and refrigerate.

Make the vinaigrette: In a small bowl combine the grapefruit zest and juice. Drizzle in the olive oil, whisking until emulsified. Add the sugar and a pinch each salt and pepper. Whisk again, taste, and adjust the seasoning as needed. Set aside.

Arrange the salad: On a large plate put 4 or 5 lettuce leaves down. Place a 1/4 of the seafood salad into the center. Then, arrange the grapefruit, jicama, radishes, and radicchio around the seafood salad. Drizzle with the vinaigrette. Enjoy!

Thursday, April 23, 2015

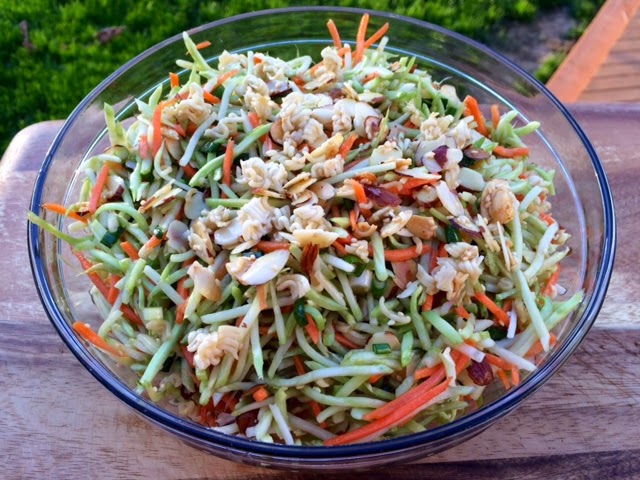
Glenda Moore's Asian Coleslaw

spring salad season...


With spring comes lighter eating, preparing us for summer, sun, and fun. So, for this rainbow series I'll post 3 different salad type recipes. Each will pay homage to different ethnic cuisines and yield a fusion style recipe. Our first stop is Asia with an Asian Coleslaw from a family friend's kitchen.

This recipe was given to my mom by one of her friend's Glenda Moore. While I haven't followed her recipe to a "T", she still deserves the credit (I hope she doesn't mind I'm posting this for anyone to see) and praise. It's delicious and always a great alternative to traditional coleslaw. Plus it's super easy to make, can totally be made ahead, and transports easily. Get ready for summer sun and make this spring type salad. Here's how...

Ingredients - Serves 8-12
Dressing
1/2 C Peanut Oil
1 T Low Sodium Soy Sauce
1/4 C Red Wine Vinegar
3/4 C Granulated Sugar

Crunchy Stuff
4 T Unsalted Butter
1 C Sliced Almonds
1 Package Ramen Noodles (any flavor), crushed
1/4 C Sesame Seeds

Slaw
2 (10 oz.) Packages Broccoli (or regular) Slaw
6 Green Onions, sliced

Directions
This recipe can be made ahead. Just put the dressing, crunchy stuff, and slaw in separate containers. When ready to eat, mix together, and serve immediately.

Make the dressing: In a small bowl combine the oil, soy sauce, red wine vinegar, and sugar. Whisk to combine. Set aside. Note: You can substitute vegetable oil if you don't have peanut (or someone has an allergy).

Make the crunchy stuff: Melt the butter in a skillet. Add the almonds, crushed ramen, and sesame seeds. Toast until lightly browned. Set aside to cool. Note: It doesn't matter what flavor ramen you buy, the packet is discarded.

Make the slaw: Combine the broccoli slaw and onions in a large bowl. Add the dressing and crunchy stuff. Toss to mix well. Serve immediately. Enjoy!

Sunday, March 22, 2015

Black Bean Hummus

little black beans...

This past week our church, Crossroads, hosted their annual "beans and rice week" to save money and change lives. We've attended this church for the past 3 years and have participated in this fundraiser each year. The idea is that for one week you eat rice and beans (or eat cheaply - we just eat whatever we have in the house), then subtract that cost from your usual weekly grocery bill, and then donate the difference. You can learn more here. So for this series I'm repeating (for the first time in 3 years - yes, I've been posting to my blog for that long!) an ingredient - black beans.

There are so many different things you can do with black beans, so even though I'm repeating this ingredient, these recipes will be original. Also, all of these recipes will start with dried beans instead of canned. I'm starting off with a black bean hummus. This recipe is quick and easy to make. You can adjust any of the ingredients to your liking - make it spicier with more cayenne or a add a diced jalapeƱo, make it smokier with more cumin, or load it up with freshness by adding more green onion and cilantro. Use what you have on hand and make this recipe (that's what I did). Here's how...

Ingredients - Serves 6-8
2 C Prepared Black Beans (1 C dried beans)
2 T Tahini Paste
3 Green Onions, chopped
1/4 C Cilantro, roughly chopped
1 Clove Garlic, minced
2 T Lemon Juice
1/2 T Chili Powder
1 tsp. Ground Cumin
1/2 tsp. Cayenne Pepper
~1/2 C Extra Virgin Olive Oil, more for drizzling
Kosher Salt
To Serve: Tortilla Chips and Assorted Veggies

Directions
To prepare the beans: The night before, put 1 cup dried black beans in a pot and cover with water by an inch or two. Cover, refrigerate, and soak until ready to cook. The day of, drain the beans, put them back into the pot, and just cover with water. Bring to a boil, then reduce the heat to low, and simmer with the lid on. Cook until tender, about 35-40 minutes. Salt about 10 minutes before the beans are done cooking. Drain, cool, and store. You will end up with 2-3 cups cooked beans.

Make the hummus: Put the beans, tahini paste, green onions, cilantro, garlic, lemon juice, chili powder, cumin, and cayenne pepper into a food processor. Pulse about 10 times, or until the beans are coarsely chopped. Next, with the motor running, drizzle in the olive oil until the hummus comes together. It will be smooth and creamy. Season with salt to taste.

Scrape the black bean hummus into a bowl and drizzle with a little more olive oil. Serve with tortilla chips and assorted veggies. The hummus will stay good refrigerated in an air-tight container for up to 10 days. Enjoy!

Thursday, November 20, 2014

Sweet 'n Spicy Twice Baked Sweet Potatoes

sugar and spice, oh so nice...

I HATED, yes HATED, sweet potatoes when I was a kid. I used to sit at the dinner table forever when they were served. I eventually ate them by holding my nose and chugging milk as a chaser. Then I had sweet potato fries and realized that I do like sweet potatoes, I just don't like how they were served when I was a kid. I'd only had sweet potatoes with marshmallows, brown sugar, and butter. So, in essence, sweet potatoes were made sweeter.

This recipe is different, I've made sweet potatoes both sweet and spicy. This recipe is a riff on the popular twice baked potato, stuffed with cheese, green onion, jalapeno, and spices. It's a great side dish for fall and for the up-coming Thanksgiving holiday. Make this dish for either occasion, here's how...

Ingredients - Serves 4
4 Medium Sweet Potatoes, scrubbed clean
2 T Unsalted Butter, melted
1 C Shredded Sharp Cheddar Cheese, plus more for topping
3 Green Onions, chopped
1 Jalapeno, seeded & chopped
1 T Chili Powder
1 tsp. Paprika
1/2 tsp. Ground Cumin
1/4 tsp. Cayenne Pepper
1 tsp. Kosher Salt
1/2 tsp. Black Pepper

Directions
Preheat the oven to 400 degrees. Place the potatoes on a baking sheet and cook for 1 hour, or until the potatoes are cooked through. Remove from the oven to cool slightly, enough to handle. Reduce the oven temperature to 350 degrees.

Once the potatoes are cooled, cut off the tops to make a canoe-shape. Reserve the tops. NOTE: You are only cutting off the top, not cutting the potato in half. Carefully scoop out the flesh, leaving enough for the skin to keep its shape. Place the scooped out potato skins back on the baking sheet.

Put the potato flesh into a mixing bowl. Add the rest of the ingredients and mix everything together really well. Taste and adjust the seasoning as needed. Then, put the potato mixture evenly back into the skins, mounding as necessary.

Top each potato with a little more cheese. Place the tops, cut side up, onto the baking sheet as well. Season with a little salt, pepper, and chili powder. Place back into the oven and bake for another 15-20 minutes, or until heated through. Serve immediately. Enjoy!

Friday, August 22, 2014

Basil Pesto Pasta Salad

beautiful basil bounty...

The end of August brings beautifully ripe tomatoes and what's a better pair with those ripe tomatoes than basil? Little, in my opinion. I have a small garden in my back yard. I grow fresh herbs and select vegetables. This year I was able to finally grow cherry tomatoes. In years past I've tried, but the squirrels usually steal them all! My basil has also taken off this year. So, I'm focusing on this beautiful end-of-summer bounty and making as many basil (and tomato) dishes as I can.

For this post I've made an easy and delicious pasta salad. What makes this pasta salad different is that I use a cheese filled pasta (think ravioli or tortellini) and toss it in a light basil pesto. The pesto here can be used in many different ways, as a sauce on hot pasta, as a simple dip with bread, or a topping for baked potatoes are my favorite. Try out this summery side before the season ends. Here's how...

Ingredients - Serves 6-8
1 1/2 C Packed Fresh Basil Leaves
1 Garlic Clove, roughly chopped
1/2 C Pine Nuts, toasted
1/4 C Grated Parmesan Cheese
1/2 C Extra Virgin Olive Oil, more as needed
1 Large (20 oz.) Package Cheese Filled Pasta, such as tortellini
Kosher Salt & Black Pepper
1 Pint Cherry Tomatoes, halved
3 Green Onions, chopped
1/2 C Corn, fresh or frozen (defrosted)

Directions
Bring a large pot of water up to a boil.

Meanwhile, make the pesto: In a food processor combine the basil, garlic, toasted nuts, cheese, and some ground black pepper. Pulse until everything is pretty well minced, about 10 pulses.

Next, with the motor running, slowly pour the olive oil through the spout on the food processor. Allow the pesto to process until nearly smooth. Scrape into a large bowl and set aside.

Finish up the pasta salad: Add a generous amount of salt and the pasta to the boiling water. Cook for about 3 minutes, or until all of the pasta floats to the top. Drain and add to the pesto. Toss well, adding a little more olive oil as needed. Stir in the tomatoes, green onion, and corn. Taste for seasoning and adjust as needed. Refrigerate for at least 2 hours before serving. Enjoy the end-of-summer bounty while it lasts.

Monday, July 28, 2014

Indian Infused Turkey Lettuce Wraps w/ Cherry Chutney

tantalize all 5 senses...

I've made many different types of lettuce wraps, but this is probably my favorite. It combines all 5 sensations of taste we can detect - salty, sour, sweet, bitter, and umami (or savory). A dish is said to be balanced when most (or all) of these tastes are incorporated. The final sense, umami, is relatively new to the scene. Albeit, proposed over 100 years ago, it was not widely accepted as one of the senses of taste until 1985. This term has become increasingly popular in American vernacular over the past decade, but is still referred to as savory by many.

Beyond balance and taste, these lettuce wraps are super easy. A simple cherry chutney, 6 ingredients including salt, are put into a sauce pan and simmered...ready when you are! And, ground turkey is infused with Indian aromatics and spices. This is a good opportunity to introduce yourself, your family, or friends to the flavors of India. Make these lettuce wraps when you need a quick, easy, and flavorful dinner. Here's how...

Ingredients - Serves 4
Chutney
3/4 lb. Fresh Cherries, pitted & halved
1/2 C Dried Cranberries
1 Orange, zest & juice
1 tsp. Yellow Mustard Seed
2 T Cider Vinegar
Kosher Salt

Lettuce Wraps
Olive Oil
1.25 lbs. Ground Turkey (suggest Jenny-O 20 oz. package)
3 Green Onions, whites & greens separated & chopped
1 inch Fresh Ginger, grated
2 Cloves Garlic, minced
1/2 T Ground Cumin
1/2 T Ground Turmeric
1 tsp. Ground Coriander
1 tsp. Garam Masala
1/2 tsp. Kosher Salt
Pinch of Cayenne
2 T Rice Wine Vinegar
2 T Cilantro, chopped
Boston Lettuce, leaves separated, cleaned, & patted dry
Optional: Hot Sauce

Directions
Begin by making the chutney:
In a heavy-bottomed sauce pan combine all the ingredients except for the salt. Bring to a boil, then reduce the heat to simmer. Cook until thick and syrupy, 20-25 minutes, stirring occasionally. Remove from the heat. Add a pinch of salt, stir smashing the cherries a bit, and cool until ready to serve.

Cook the turkey filling: Heat a large skillet over med-high. Add 2-3 T olive oil and the turkey. Spread into an even layer in the pan. Leave, undisturbed, for 3-4 minutes to brown the meat. Once the meat has begun to caramelize, add the onion whites, ginger, and garlic. Stir to incorporate and continue cooking.

As the meat browns, make the spice mixture. In a small bowl combine the cumin, turmeric, coriander, garam masala, salt, and cayenne. Stir to blend.

In the final minute of cooking, add the spice mixture and vinegar to the turkey. Stir to combine everything well. Allow the vinegar to cook out and then remove from the heat and stir in the green onion tops and cilantro. Taste for seasoning; add as needed.

Finally, build the lettuce wraps: Place a lettuce cup on a plate. Add about 1/4 cup Indian infused turkey mixture and top with a couple tablespoons of cherry chutney. If desired, add a few drops of your favorite hot sauce. Wrap up and eat...then repeat. Enjoy!