Showing posts with label grilled. Show all posts

Monday, June 29, 2015

Grilled Coffee-Chili Rubbed Beer Can Chicken

dad-worthy dinner...

As I mentioned, for this series I'll be posting "dad-worthy" recipes featuring coffee. It's pretty awesome how many different ways you can use it. For this recipe I'm using it like a spice and rubbing it on a small whole chicken. But, I'm not stopping there, no sir! I'm grilling it as well over top of a can of beer. I'm not sure this recipe can get more manly!

Inspiration for the spice rub came from Cincinnati Chili. If you're not familiar, it's a mixture of chili powder, paprika, onion powder, garlic powder, unsweetened cocoa powder, cinnamon and/or allspice, and a few other spices. It's a very odd combination, but distinctly known in the Cincinnati area. It also just happens to be one of my dad's favorite foods. As a side note, one piece of special equipment is needed for this recipe - a beer can chicken stand. I found mine at Bed, Bath, and Beyond for just five bucks (Bayou Classic Stainless Steel Chick CAN Cooking Rack)...thank you 20% off infamous discount coupon. Other than that, this recipe just takes some time to cook, but it's quite easy. So, if you are hanging pool side, having a party, or just want to impress Dad, make this recipe. Here's how...

Ingredients - Serves 4
Coffee-Chili Rub
2 T Fresh Ground Coffee
2 T Ancho Chile Powder
1 T Unsweetened Cocoa Powder
1 T Dark Brown Sugar
1/2 T Onion Powder
1 tsp. Kosher Salt
1/2 tsp. Ground Cinnamon
1/2 tsp. Ground Black Pepper
1/4 tsp. Ground Cayenne (optional)

Beer Can Chicken
3-4 lb. Roasting Chicken
1-2 T Olive Oil
1/2 T Kosher Salt
~3 T Coffee-Chili Rub
1 Can Nut Brown Ale (suggest Jackie O's Chomolungma)
Special Equipment: Beer Can Chicken Stand

Directions
Preheat a charcoal grill to 325 degrees. The chicken should be cooked over indirect heat. So, make sure to put all of the hot coals on one side of the grill. Also, make sure you can shut your grill with the chicken on the stand. It'll be about a foot tall.

Make the spice rub: In a small bowl combine the ground coffee, chili powder, cocoa powder, sugar, onion powder, salt, cinnamon, black pepper, and cayenne. Whisk together and set aside. NOTE: This will make more than you will need. Store the extra in a sealed container in a dry place.

Prepare the chicken: Pat the chicken dry. Coat with a little olive oil, sprinkle with salt, and then rub with the spice mixture (about 3 T). Be sure to season and rub the chicken on both the inside and out. Following the directions on the beer stand package, pour out half the can of beer, and reserve for another use (i.e. drinking). Then put the can into the stand and carefully place the chicken on top.

Cook the chicken: Grill over indirect heat at 325 degrees for 50-60 minutes, or until an instant-read thermometer placed in a thigh reads 165 degrees. Rotate the chicken to ensure even cooking.

Rest, carve, and serve: Once the chicken is cooked through, carefully remove the entire rack to a rimmed baking sheet, and rest for 10 minutes. Then, using tongs, remove the chicken from the stand and place on a cutting board, discard the beer once cooled. Carve the chicken and serve with more beer and your Dad's favorite sides. Enjoy!

Saturday, June 6, 2015

Easy Grilled Stuffed Zucchini

very versatile vegetable...

With the start of summer comes some of my favorite squash - zucchini. So, for this series I'll focus on this green beauty. Zucchini is a very versatile vegetable. It can be served for breakfast, lunch, or dinner, as a side, in bread, and more. It pairs well with different cuisines such as Mexican, Italian, and Asian. And, it can be sauteed, baked, or grilled. For this side dish I've made stuffed zucchini, a classic dish, but I'm putting it on the grill for a fun twist.

I've stuffed the zucchini simply with corn, pico de gallo salsa, and fresh cilantro. I learned a new method to steam corn and this was the perfect dish to introduce it. I'm also taking a little help from the store in using pico de gallo salsa. It has tomatoes, onion, pepper, and usually cilantro in it. Summer cooking should be easy and this dish is just that. Try something new and make this side tonight. Here's how...

Ingredients - Serves 8
4 Medium Zucchini
Extra Virgin Olive Oil
Kosher Salt
Black Pepper
2 Ears Fresh Corn
1/2 C Pico De Gallo Salsa
5 oz. Queso Fresco, crumbled
3 Sprigs Fresh Cilantro (optional), roughly chopped

Directions
Preheat the grill to 350 degrees.

Prepare the zucchini: Halve each zucchini length-wise. Trim the ends, but don't cut all the way off. The zucchini should look like a canoe. Using a spoon, hollow out the middle, leaving most of the flesh in tact. Put the zucchini cut-side up into a grill-proof pan (suggest cast iron). Drizzle with some olive oil and sprinkle with salt and pepper. Rub to coat well. Grill cut-side down until marked and nearly cooked through. Put back into the pan, cut-side up. Set aside.

Make the stuffing: Put the corn into the microwave (do not shuck) and cook for 3 minutes on high. Carefully remove and cool to handle. Then, shuck the corn - the silts fall right off and you have perfectly steamed corn! Cut the kernels off the cob and put in a large bowl. Stir in the pico de gallo and queso fresco.

Stuff the zucchini & finish grilling: Spoon the stuffing evenly into the grilled zucchini. Put the entire pan back on the grill and cook covered for another 5-7 minutes, or until warmed through. Top with the chopped cilantro and serve immediately. Enjoy!

Thursday, May 28, 2015

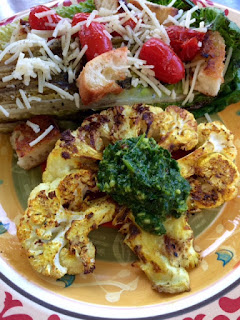
Grilled Curry Cauliflower Steaks w/ Chimichurri

a whole lot of grilling going on...

There's lots of grilling going on now that summer has unofficially started. Thank you Memorial Day weekend! And, as most of you know, I don't eat chicken, beef, or pork...so...what to grill? Well, there's lots of things I can eat. Any seafood is great on the grill. I enjoy a veggie burger now and then. And, portobello mushrooms are fantastic grilled. Fruit is also a winner - pineapple, peaches, even strawberries. But when I saw Guy Fieri grill cauliflower "steaks" on one of his shows last year, I was inspired. So, for this post I'm grilling cauliflower!

I have to admit that I'm not a big fan of cauliflower raw, but roasted with spices it's pretty good. So, of course grilled cauliflower coated in curry powder has to be tasty. I'm again using the curry powder I made. Check out my prior post for the recipe. But, that didn't seem like quite enough. So, I thought, what is steak served with? And, chimichurri came to mind. If you've never had chimichurri it's a lot like a pesto, but with different herbs and no Parmesan cheese or nuts. The recipe I've posted here came from someone I used to work with and it was the perfect addition to my steaks. Grill something new, cauliflower steaks, here's how...

Ingredients - Serves 4
Chimichurri
1 C Fresh Flat Leaf Parsley
1 C Fresh Cilantro
1/4 C Fresh Oregano
2 Cloves Garlic, chopped
1/2 Lime, zest & juice
1/2 tsp. Kosher Salt
1/4 tsp. Red Pepper Flakes
2 T Extra Virgin Olive Oil

Cauliflower Steaks
2 Heads Cauliflower
1/4 C Olive Oil
1 T Curry Powder
Kosher Salt & Black Pepper

Directions
Preheat a grill (or grill pan) to 350 degrees.

Make the chimichurri: Combine the parsley, cilantro, oregano, and garlic in a food processor. Pulse to roughly chop. Add the lime zest, juice, salt, and pepper. Then, with the motor running, drizzle in the olive oil until everything comes together. Remove to a bowl and set aside.

Prepare the steaks: Remove the green outer leaves from the cauliflower heads; leave the core intact. Set the cauliflower on their base and halve them vertically. Then slice each half vertically again, into 1 inch steaks. Reserve the ends for another use. Put the steaks on a sheet tray and coat them on both sides with the olive oil, curry powder, and a pinch each of salt and pepper.

Grill the steaks & serve: Place the steaks on the preheated grill and cook for about 5 minutes per side, or until golden brown and marked. Remove to plates and top with the chimichurri. We had grilled Romain salads with ours. Enjoy!

Monday, August 11, 2014

Grilled Fish Tacos w/ Fresh Peach Salsa

this recipe is just peachy-keen...

I visited my family in Huntington, WV this past weekend. I planned the trip in so that I could swim in my Papaul's pool one more time - he says this is the last time he'll be opening it but, we will see. Unfortunately, the weather didn't cooperate (it was cloudy and a little cold) but, that didn't stop me. I still got in. It was fun to reminisce about the things we did (as kids) in that pool. So, many memories! One thing we always did on those summer days was cookout. So, in keeping with tradition, my husband and I made a big meal with the help of our family.

The star of the meal was my fresh peach salsa. Peaches, tomatoes, peppers, onion, and more are chopped up, mixed together, and served. I served this salsa with both grilled fish and pork and some other taco fixings. While I don't eat pork, I was told the rub I made (same as the fish with the addition of onion powder) was delicious. So, try this with what you like, even a chip will do. Here's how to make it...

Ingredients - Serves 8-10
Peach Salsa
4 Peaches, peeled, pitted, & diced
4 Roma Tomatoes, diced
1 Red Bell Pepper, diced
1/2 Red Onion, fine diced
1 Jalapeno, seeded & fine diced
1 Chipotle in Adobo, chopped + 1 T sauce
1 Lime, juiced
1-2 tsp. Granulated Sugar

Grilled Fish & Fixings
1 T Smoked Paprika
1 T Chile Powder
1/2 T Ground Cumin
1/4 tsp. Cayenne Pepper
1 tsp. Kosher Salt
1/2 tsp. Black Pepper
6 Tilapia Fillets
Olive Oil
Corn/Flour Tortillas
Optional Fixings: Lime Wedges, Sour Cream, & Cilantro

Directions
Begin by making the salsa: Combine the peaches, tomatoes, red pepper, onion, jalapeno, chipotle, adobo sauce, lime juice, and sugar in a large bowl. Toss everything together and taste. As needed, adjust the sugar. Cover and refrigerate at least 3 hours.

Prepare the fish: In a small bowl combine the spices, salt, and pepper. Place the fish on a tray and drizzle with a little olive oil. Sprinkle the spice rub on both sides and rub to coat the fish well. Set aside for 10 minutes.

Grill the fish: Meanwhile, heat the grill to med-high. Then add the fish and cook until opaque all the way through, 4-5 minutes per side. Remove to a plate, cool a bit, then cut into pieces. Grill the tortillas, if desired.

Assemble the tacos: On a tortilla place a few pieces of fish, 2-3 T peach salsa, sour cream, and cilantro, if desired. Serve with a lime wedge and your favorite Mexican sides. Enjoy!

Friday, May 23, 2014

Grilled Simple Salmon w/ Dill Gremolata

fresh is best

Memorial Day Weekend is coming up. It's the (un)official kick-off to summer for many and the grills will be out in full force. So, for this post I've made an easy grilled salmon with a fresh herb topping - a gremolata. Gremolata is a northern Italian (Milanese) topping traditionally served with osso buco (veal shank braised with vegetables). The traditional ingredients are simple - parsley, garlic, and lemon zest. Because I'm serving my gremolata with salmon what could be better than subbing in dill for parsley?

This dish will take less than 20 minutes to prepare from start to finish. And, that's good because who wants to spend more time cooking than necessary on this beautiful weekend? Make this simple supper to start the summer. Here's how...

Ingredients - Serves 4
For the Salmon:
1.5 lbs. Salmon, skin-on
2 T Lemon Extra Virgin Olive Oil (suggest The Spicy Olive)
1 1/2 tsp. Kosher Salt
1 tsp. Black Pepper
1 Lemon

For the Gremolata:
1/4 C Fresh Dill, minced
2 T Fresh Parsley, minced
2 Garlic Cloves, minced
Zest of 1 Lemon

Directions
Preheat the grill to about 375.

Put the salmon, skin-side down, on a baking sheet. Drizzle the lemon oil on top. If you don't have lemon flavored oil, you can use regular extra virgin olive oil. Sprinkle the salt and pepper over top. Then rub the oil, salt, and pepper all over the top of the salmon. Set this aside and make the gremolata.

In a small bowl, add the minced dill, parsley, and garlic. Zest the lemon into the bowl and stir everything together. Set aside. Cut the lemon in half and put on the baking sheet with the salmon.

Grill the salmon, skin-side down, with the lid shut for 10-12 minutes (15 minutes for well done). The grill acts as an oven, so there is no need to flip the salmon. Also, I prefer to grill salmon with the skin on as it keeps the fish together and protects the meat. 2-3 minutes before the salmon is done add the lemon, cut-side down, to the grill. Grill until marked. Once the salmon is cooked through, remove from the grill. Allow it to rest for 2 minutes before cutting into 4 fillets.

Serve the salmon topped with about 3 T of the gremolata and a squeeze of juice from the grilled lemon. I served this salmon with Grilled Parmesan Potatoes (see below for the recipe) and a salad. Enjoy your Memorial Holiday weekend and the (un)official kick-off to summer!


Grilled Parmesan Potatoes: Thinly slice Yukon Gold or Red Skin Potatoes and arrange in a single layer in a foil packet. Top with salt, pepper, and Parmesan cheese. Drop dollops of butter all over the top, seal the packet, and grill until cooked through, 25-30 minutes. Ours got a little too done, but they were nice and crispy!