meatless meal in minutes...
It was a busy weekend and I've had little time to think about my blog and this post. So, I needed something quick and easy tonight. One of my favorite things to make when time is short and I need to make dinner is polenta - it cooks in 3 minutes, much quicker than pasta. It's a lot like grits if you've never had it before. And it's really good with butter and cheese...especially with Gorgonzola cheese. Yum!
Polenta is an Italian staple, so I'm topping it with a classic sauce - Marsala. Typically chicken is served with this sauce (and that's what I made for my husband; he hates mushrooms). But, to make this a vegetarian meal, I just left it out and doubled the amount of mushrooms. This simple supper is nearly a whole meal as well, just serve it with your favorite green vegetable. Need a deliciously easy meal in minutes? Make this for dinner, here's how...
Ingredients - Serves 4
Mushroom Marsala
2 T Olive Oil
1 lb. Sliced Mushrooms (such as crimini)
1 Clove Garlic, minced
1/2 T Fresh Thyme, chopped
2 T All-Purpose Flour
1/2 C Sweet Marsala Wine
1/2 C Vegetable Broth
2 T Unsalted Butter
1/4 C Fresh Parsley, chopped
Gorgonzola Polenta
1 Box Quick-Cooking Polenta (4 servings)
1/4 C Half & Half
1 T Unsalted Butter
4 oz. Gorgonzola Cheese, crumbled
Arugula Salad
2 C Baby Arugula
1/2 Lemon, juiced
1 T Extra Virgin Olive Oil
Kosher Salt & Black Pepper
Directions
Following the directions on the polenta box, bring 4 1/2 C of water to a boil in a sauce pan.
Brown the mushrooms: Heat the olive oil over medium. Add the mushrooms and cook until browned about 5 minutes. Hold off salting them, this draws out liquid and keeps the mushrooms from browning. Stir in the thyme, garlic, and a pinch each of salt and pepper. Cook for another minute.
Make the sauce: Add the flour to the mushrooms and cook out, about one minute. Pour the Marsala into the pan and boil down for a few seconds. Then add the vegetable broth and simmer for a minute to reduce the sauce slightly. Stir in the butter and parsley. Taste for seasoning and keep warm.
Make the polenta: Salt the boiling water and slowly whisk the polenta into it. Turn off the heat and continue whisking for 2-3 minutes or until cooked through. Whisk in the half and half and butter. Finally stir in the crumbled Gorgonzola cheese.
Plate the dish: In a bowl combine the arugula, lemon juice, oil, and a pinch each salt and pepper. Toss to combine. In a shallow bowl put down a bed of the polenta, top with the mushroom Marsala, and finish with the arugula salad. Serve with your favorite green vegetable. Enjoy!
Monday, July 13, 2015
Sunday, July 5, 2015
Tomato & Sweet Onion Salad with Gorgonzola Vinaigrette
simple summer salad for a crowd...
This 4th of July weekend was full of family, friends, and of course food. We celebrated on both Friday and Saturday so I had plenty of opportunity to make something yummy, but I also wanted to relax. So, what's easier than a salad? This recipe came from one of my husband's family members - thanks Marcie! - and I told her I'd post it to my blog one day. Well, that day is here, and what a yummy salad this was.
For this blue series I'll be focusing on Gorgonzola cheese. It's similar to blue cheese, but in my opinion, a little more mild. So, if you aren't a big fan of blue cheese, you might try Gorgonzola. The cheese in the vinaigrette is precisely what makes this salad so delicious and different. This side salad serves a crowd, so make it for your next party. Here's how...
Ingredients - Serves 10-12
Vinaigrette
1/2 C White Wine Vinegar
3/4 C Extra Virgin Olive Oil
1/4 C Fresh Parsley, minced
1 tsp. Black Pepper
1 (5oz.) Container Crumbled Gorgonzola Cheese
Salad
2 Heads Romain Lettuce, torn
1 Large Vidalia (sweet) Onion, sliced
5-6 Tomatoes, sliced
2-3 Sprigs Fresh Parsley, torn
Kosher Salt & Black Pepper
Directions
Prepare the lettuce, onion, tomatoes, and parsley.
Make the vinaigrette: In a bowl combine the white wine vinegar, extra virgin olive oil, parsley, and black pepper. Whisk together. Add the Gorgonzola cheese, stir, and set aside.
Arrange the salad: On a large platter put down a bed of the torn Romain lettuce. Top with the sliced sweet onion and then the tomatoes. Finally, sprinkle on the parsley and a little salt and pepper. Serve with the Gorgonzola vinaigrette. Enjoy!
Wednesday, July 1, 2015
Affogato
after dinner affogato...
My dad is a simple food person and since this series of recipes is for him, I'm making a very simple dessert - an affogato. It's an Italian dessert of ice cream or gelato served with a shot of expresso poured over top. That's it! Affogato means "drowned" in Italian, so in essence we are drowning ice cream or gelato in expresso. Besides coffee, ice cream is definitely one of my dad's weaknesses (me too!).
This dessert isn't really even a recipe because it's so simple. It's perfect for a crowd because you can top it as each person likes (or let them do it). Among the optional toppings and add-ins my favorite are shaved dark chocolate, toasted slivered almonds, whipped cream, and a shot of Godiva Liquor. But, make it any way you like it (or how your dad likes it). Here's how...
Ingredients - Makes 1 Dessert
2 Scoops Ice Cream or Gelato (suggest vanilla, chocolate, or coffee)
1 Shot Expresso (or 3T strong brewed coffee)
Optional Toppings & Add-ins: Shaved Dark Chocolate, Toasted Hazelnuts/Slivered Almonds, Whipped Cream, 1 Shot Frangelico/Grand Marnier/Godiva Liquor, and/or Biscotti
Directions
Make the expresso or strong brewed coffee.
Put 2 scoops of ice cream or gelato in a serving dish. Top with the shot of expresso and any other optional toppings or add-ins desired. Enjoy this simple dessert on a warm summer evening.
Labels:
affogato,
almonds,
biscotti,
coffee,
dark chocolate,
dessert,
expresso,
gelato,
hazelnuts,
ice cream,
whipped cream
Monday, June 29, 2015
Grilled Coffee-Chili Rubbed Beer Can Chicken
dad-worthy dinner...
As I mentioned, for this series I'll be posting "dad-worthy" recipes featuring coffee. It's pretty awesome how many different ways you can use it. For this recipe I'm using it like a spice and rubbing it on a small whole chicken. But, I'm not stopping there, no sir! I'm grilling it as well over top of a can of beer. I'm not sure this recipe can get more manly!
Inspiration for the spice rub came from Cincinnati Chili. If you're not familiar, it's a mixture of chili powder, paprika, onion powder, garlic powder, unsweetened cocoa powder, cinnamon and/or allspice, and a few other spices. It's a very odd combination, but distinctly known in the Cincinnati area. It also just happens to be one of my dad's favorite foods. As a side note, one piece of special equipment is needed for this recipe - a beer can chicken stand. I found mine at Bed, Bath, and Beyond for just five bucks (Bayou Classic Stainless Steel Chick CAN Cooking Rack)...thank you 20% off infamous discount coupon. Other than that, this recipe just takes some time to cook, but it's quite easy. So, if you are hanging pool side, having a party, or just want to impress Dad, make this recipe. Here's how...
Ingredients - Serves 4
Coffee-Chili Rub
2 T Fresh Ground Coffee
2 T Ancho Chile Powder
1 T Unsweetened Cocoa Powder
1 T Dark Brown Sugar
1/2 T Onion Powder
1 tsp. Kosher Salt
1/2 tsp. Ground Cinnamon
1/2 tsp. Ground Black Pepper
1/4 tsp. Ground Cayenne (optional)
Beer Can Chicken
3-4 lb. Roasting Chicken
1-2 T Olive Oil
1/2 T Kosher Salt
~3 T Coffee-Chili Rub
1 Can Nut Brown Ale (suggest Jackie O's Chomolungma)
Special Equipment: Beer Can Chicken Stand
Directions
Preheat a charcoal grill to 325 degrees. The chicken should be cooked over indirect heat. So, make sure to put all of the hot coals on one side of the grill. Also, make sure you can shut your grill with the chicken on the stand. It'll be about a foot tall.
Make the spice rub: In a small bowl combine the ground coffee, chili powder, cocoa powder, sugar, onion powder, salt, cinnamon, black pepper, and cayenne. Whisk together and set aside. NOTE: This will make more than you will need. Store the extra in a sealed container in a dry place.
Prepare the chicken: Pat the chicken dry. Coat with a little olive oil, sprinkle with salt, and then rub with the spice mixture (about 3 T). Be sure to season and rub the chicken on both the inside and out. Following the directions on the beer stand package, pour out half the can of beer, and reserve for another use (i.e. drinking). Then put the can into the stand and carefully place the chicken on top.
Cook the chicken: Grill over indirect heat at 325 degrees for 50-60 minutes, or until an instant-read thermometer placed in a thigh reads 165 degrees. Rotate the chicken to ensure even cooking.
Rest, carve, and serve: Once the chicken is cooked through, carefully remove the entire rack to a rimmed baking sheet, and rest for 10 minutes. Then, using tongs, remove the chicken from the stand and place on a cutting board, discard the beer once cooled. Carve the chicken and serve with more beer and your Dad's favorite sides. Enjoy!
Sunday, June 21, 2015
Red-Eye Poutine
here's to Dad...
When I think about my dad and the things he likes they include: house projects (he's the ultimate fixer-upper), TV (he's master of the controller), hamburgers/hot dogs/chicken patties (he's pretty much a simple meat guy), and coffee. When I was growing up that was a very familiar smell to me every morning and on evenings when we had family or friends over. I have grown to love coffee myself (must have every morning to function!) and that started at a very young age. So, for this next series I'll be focusing on coffee and at the same time creating Dad-worthy dishes.
This dish is an appetizer my dad is sure to love - poutine. Poutine is a Canadian-born concoction of french fries, gravy, and cheddar cheese curds. If you've never had it or heard of it, check out this article. I'm twisting up this classic dish by adding coffee. I was inspired by "red-eye gravy," which is typically served with ham. My dad loves gravy and biscuits and loaded cheese fries, so I think I have a winner here. Celebrate Dad today, make this dish. Here's how...
Ingredients - Serves 6-8
1 (32 oz.) Bag Frozen French Fries
4 T Unsalted Butter
1/4 C All-Purpose Flour
1 Shallot, minced
1 Clove Garlic, minced
2 1/2 C Low-Sodium Beef Broth
1 1/2 C Brewed Coffee
2 T Ketchup
1 T Cider Vinegar
1 T Black Pepper Corns
1/2 tsp. Worcestershire Sauce
1 tsp. Kosher Salt
10 oz. Cheddar Cheese Curds
Directions
Make the fries: Follow the baking (or frying) instructions on the bag. If baking, keep the oven warm. If not, heat the oven to 425 degrees.
Meanwhile, make the gravy: Heat a large skillet over medium heat. Add the butter and flour and whisk to make a roux. Add the minced shallot and garlic, cook for 1-2 minutes. Slowly add the beef broth and coffee, whisking. Whisk in the remaining ingredients, except for the cheese curds. Increase the heat to med-high and bring to a boil. Cook, whisking, until thickened, about 15 minutes. Keep warm. Optional: Strain the gravy to remove the peppercorns.
Make the poutine: Put the fries in a shallow dish, top with the gravy and cheese curds. Put into the warm oven and bake until warmed through and the cheese begins to melt, 8-10 minutes. Serve immediately. Make this Dad-worthy meal today.
Happy Father's Day Dad!
Labels:
appetizer,
beef broth,
cheddar cheese curds,
coffee,
fries,
gravy,
ketchup,
poutine,
Red-Eye Poutine,
shallot
Wednesday, June 17, 2015
Dark Chocolate Chunk-Zucchini Bread
break bread...
For my final post in this series I've made a usual subject as far as zucchini goes - zucchini bread. But, to pass it off as a dessert, I've added dark chocolate chunks into the mix. This bread is still perfect for breakfast, but it's also enough to satisfy my sweet-tooth after dinner. Break bread any time of the day!
This recipe is a little different than those for traditional breakfast bread. It uses oil and yogurt instead of butter, which helps keep the bread moist. It has both granulated and light brown sugar, which gives the crust a nice crunch. And finally, it primarily contains allspice, instead of the usual cinnamon. The next time you need to make a dessert, consider trying this twist on a classic. Here's how...
Ingredients - Makes 1 Loaf
Cooking Spray
1 C Shredded Zucchini, squeezed dry
1/2 C Vegetable Oil
1/2 C Plain Greek Yogurt (low-fat okay)
2 Eggs
1 tsp. Vanilla Extract
1 1/2 C All Purpose Flour
1/2 C Granulated Sugar
1/2 C Light Brown Sugar, packed
1 tsp. Baking Powder
1 tsp. Allspice
1/2 tsp. Salt
1/4 tsp. Baking Soda
1/4 tsp. Nutmeg
1 C Dark Chocolate Chunks
Directions
Preheat the oven to 350 degrees. Line a 9x5 loaf pan with parchment paper, leaving an overhang on two sides. Coat with cooking spray. Set aside.
Combine the wet ingredients: In a medium bowl combine the shredded zucchini, oil, yogurt, eggs, and vanilla extract. Mix together well and set aside.
Combine the dry ingredients: In a large bowl combine the flour, sugars, baking powder, allspice, salt, baking soda, and nutmeg. Whisk well and then stir in the dark chocolate chunks.
Bake the bread: Fold the wet ingredients into the dry, just until everything is incorporated. Pour into the prepared loaf pan. Bake for 60-65 minutes, or until a toothpick inserted into the center comes out clean.
Cool and serve: Allow the bread to cool for an hour in the pan. Then remove to a rack to cool completely. Slice to serve. To store: wrap in plastic wrap and then foil. Store at room temperature for up to one week. Enjoy!
Saturday, June 13, 2015
Zucchini "Pasta" with Fresh Cherry Tomato Sauce
lighten up...
Naturally the summer brings with it fresh fruit and produce and with that also comes lighter meals. I tend, at least, to cook with more of these fresh ingredients and less with comfort type foods. However, there's one comfort I'm not willing to give up - even in summer - and that's pasta. So, for this post, I'm lightening up an easy pasta dinner by subbing in half of the pasta I would normally use for zucchini.
To make this meal possible you will need one bit of special equipment - a julienne peeler (or maybe your food processor). I ordered this tool on Amazon at the same time I ordered my Popsicle molds (remember I said I would feature another tool!) and have yet to use it. This was the perfect meal to try it out! Overall, it was pretty easy to use (once I got the hang of it), but beware, the blade is sharp and you won't be able to julienne the entire zucchini, just use as much as you can. Anyway, once the zucchini is prepared, the rest of the recipe is quite easy to make and sings summer. I serve this with crusty bread and have no guilt - hey, I cut out half my carbs already by subbing in zucchini! So, lighten up and make this summery pasta dish. Here's how...
Ingredients
2-3 Zucchini
1/2 Box Whole Wheat Spaghetti
2 T Olive Oil
2 Cloves Garlic, minced
1 Shallot, minced
2 Pints Cherry Tomatoes
1/3 C Dry White Wine
Kosher Salt & Black Pepper
1/2 C Fresh Basil, chopped
1 T Fresh Oregano, chopped
1/2 C Grated Parmesan Cheese, more for topping
To Serve: Crusty Bread
Directions
Bring a large pot of water to a boil.
Prepare the zucchini: Using a julienne peeler (suggest OXO), cut the zucchini into long strands (like pasta). Put the cut zucchini on a paper towel lined plate, season with 1 tsp. salt, toss, and allow to stand for 10-12 minutes. Then, squeeze dry (there will be lots of liquid) and set aside.
Meanwhile, make the sauce: In a large high-sided skillet, heat the oil over med-high. Add the garlic and shallots, cook for 1 minute. Then add the cherry tomatoes and cook for 5-6 minutes, or until they begin to soften. Next, add the wine and season with a little salt and pepper. Cover and cook until the tomatoes burst, about 15 minutes. Remove the lid and reduce down into a thick and paste-like sauce, about 5 more minutes.
Cook the "pasta": Generously season the boiling pot of water with salt and drop the whole wheat pasta. Cook until al dente, 8-10 minutes. Reserve 1 cup pasta cooking water and drain the pasta. Add the zucchini to the sauce and some of the pasta cooking water. Cook for 3-4 minutes or until the zucchini begins to soften. Add the drained whole wheat pasta and continue to cook for another 2-3 minutes, adding more pasta cooking water as needed. Add the basil, oregano, and cheese and toss to combine. Taste for seasoning and adjust as needed.
Plate the pasta: Serve the dish immediately sprinkled with more Parmesan cheese and crusty bread on the side for sopping up the sauce (and have no guilt!). Enjoy this light and summery pasta. Mangia!
Saturday, June 6, 2015
Easy Grilled Stuffed Zucchini
very versatile vegetable...
With the start of summer comes some of my favorite squash - zucchini. So, for this series I'll focus on this green beauty. Zucchini is a very versatile vegetable. It can be served for breakfast, lunch, or dinner, as a side, in bread, and more. It pairs well with different cuisines such as Mexican, Italian, and Asian. And, it can be sauteed, baked, or grilled. For this side dish I've made stuffed zucchini, a classic dish, but I'm putting it on the grill for a fun twist.
I've stuffed the zucchini simply with corn, pico de gallo salsa, and fresh cilantro. I learned a new method to steam corn and this was the perfect dish to introduce it. I'm also taking a little help from the store in using pico de gallo salsa. It has tomatoes, onion, pepper, and usually cilantro in it. Summer cooking should be easy and this dish is just that. Try something new and make this side tonight. Here's how...
Ingredients - Serves 8
4 Medium Zucchini
Extra Virgin Olive Oil
Kosher Salt
Black Pepper
2 Ears Fresh Corn
1/2 C Pico De Gallo Salsa
5 oz. Queso Fresco, crumbled
3 Sprigs Fresh Cilantro (optional), roughly chopped
Directions
Preheat the grill to 350 degrees.
Prepare the zucchini: Halve each zucchini length-wise. Trim the ends, but don't cut all the way off. The zucchini should look like a canoe. Using a spoon, hollow out the middle, leaving most of the flesh in tact. Put the zucchini cut-side up into a grill-proof pan (suggest cast iron). Drizzle with some olive oil and sprinkle with salt and pepper. Rub to coat well. Grill cut-side down until marked and nearly cooked through. Put back into the pan, cut-side up. Set aside.
Make the stuffing: Put the corn into the microwave (do not shuck) and cook for 3 minutes on high. Carefully remove and cool to handle. Then, shuck the corn - the silts fall right off and you have perfectly steamed corn! Cut the kernels off the cob and put in a large bowl. Stir in the pico de gallo and queso fresco.
Stuff the zucchini & finish grilling: Spoon the stuffing evenly into the grilled zucchini. Put the entire pan back on the grill and cook covered for another 5-7 minutes, or until warmed through. Top with the chopped cilantro and serve immediately. Enjoy!
Labels:
cilantro,
corn,
Easy Grilled Stuffed Zucchini,
grilled,
queso fresco,
Salsa,
side dish,
zucchini
Sunday, May 31, 2015
Creamy Curried Coconut Frappe
inspirations from India...
To finish up this series, I've made a frozen coconut cocktail laced with curry powder. Just a little goes a long way with this drink. I was inspired in two ways when dreaming up this concoction. First, is that many Indian curries are made with coconut milk and of course curry powder. And second, I thought about chai tea and all the different spices combined with steamed milk. Chai tea also comes from India, how appropriate!
So, for this recipe I've combined toasted coconut, Bailey's, coconut rum, milk, curry powder, and ice in a blender. Whiz it up in seconds and serve with a little more curry powder and toasted coconut for garnish. Again, I'm using the curry powder I made in the first post of this series, but any will do. This drink is a fun and delicious twist on a classic creamy coconut cocktail. Try it tonight. Here's how to make it...
1/2 C Shredded Sweetened Coconut
1 C Bailey's Irish Cream
1/2 C Coconut Rum
1 C Milk
1 tsp. Curry Powder, more for garnish
2-3 C Ice Cubes
Directions
Preheat the oven to 300 degrees.
Toast the coconut: Spread the coconut onto a baking sheet. Place in the preheated oven and bake for 20-25 minutes, tossing every 10 minutes. Remove and cool.
Make the frappe: In a blender combine 1/3 C toasted coconut, Bailey's, coconut rum, milk, curry powder, and ice. Blend until the ice is crushed and the drink is smooth.
Garnish and serve: Divide the drink among 4, 8 oz. glasses. Garnish with a sprinkle of curry powder and toasted coconut. Serve with a straw and enjoy. Cheers!
Thursday, May 28, 2015
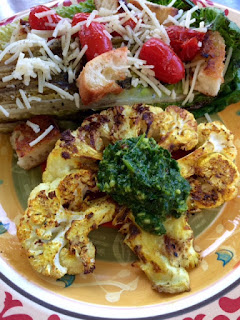
Grilled Curry Cauliflower Steaks w/ Chimichurri
a whole lot of grilling going on...
There's lots of grilling going on now that summer has unofficially started. Thank you Memorial Day weekend! And, as most of you know, I don't eat chicken, beef, or pork...so...what to grill? Well, there's lots of things I can eat. Any seafood is great on the grill. I enjoy a veggie burger now and then. And, portobello mushrooms are fantastic grilled. Fruit is also a winner - pineapple, peaches, even strawberries. But when I saw Guy Fieri grill cauliflower "steaks" on one of his shows last year, I was inspired. So, for this post I'm grilling cauliflower!
I have to admit that I'm not a big fan of cauliflower raw, but roasted with spices it's pretty good. So, of course grilled cauliflower coated in curry powder has to be tasty. I'm again using the curry powder I made. Check out my prior post for the recipe. But, that didn't seem like quite enough. So, I thought, what is steak served with? And, chimichurri came to mind. If you've never had chimichurri it's a lot like a pesto, but with different herbs and no Parmesan cheese or nuts. The recipe I've posted here came from someone I used to work with and it was the perfect addition to my steaks. Grill something new, cauliflower steaks, here's how...
Ingredients - Serves 4
Chimichurri
1 C Fresh Flat Leaf Parsley
1 C Fresh Cilantro
1/4 C Fresh Oregano
2 Cloves Garlic, chopped
1/2 Lime, zest & juice
1/2 tsp. Kosher Salt
1/4 tsp. Red Pepper Flakes
2 T Extra Virgin Olive Oil
Cauliflower Steaks
2 Heads Cauliflower
1/4 C Olive Oil
1 T Curry Powder
Kosher Salt & Black Pepper
Directions
Preheat a grill (or grill pan) to 350 degrees.
Make the chimichurri: Combine the parsley, cilantro, oregano, and garlic in a food processor. Pulse to roughly chop. Add the lime zest, juice, salt, and pepper. Then, with the motor running, drizzle in the olive oil until everything comes together. Remove to a bowl and set aside.
Prepare the steaks: Remove the green outer leaves from the cauliflower heads; leave the core intact. Set the cauliflower on their base and halve them vertically. Then slice each half vertically again, into 1 inch steaks. Reserve the ends for another use. Put the steaks on a sheet tray and coat them on both sides with the olive oil, curry powder, and a pinch each of salt and pepper.
Grill the steaks & serve: Place the steaks on the preheated grill and cook for about 5 minutes per side, or until golden brown and marked. Remove to plates and top with the chimichurri. We had grilled Romain salads with ours. Enjoy!
Subscribe to:
Posts (Atom)